
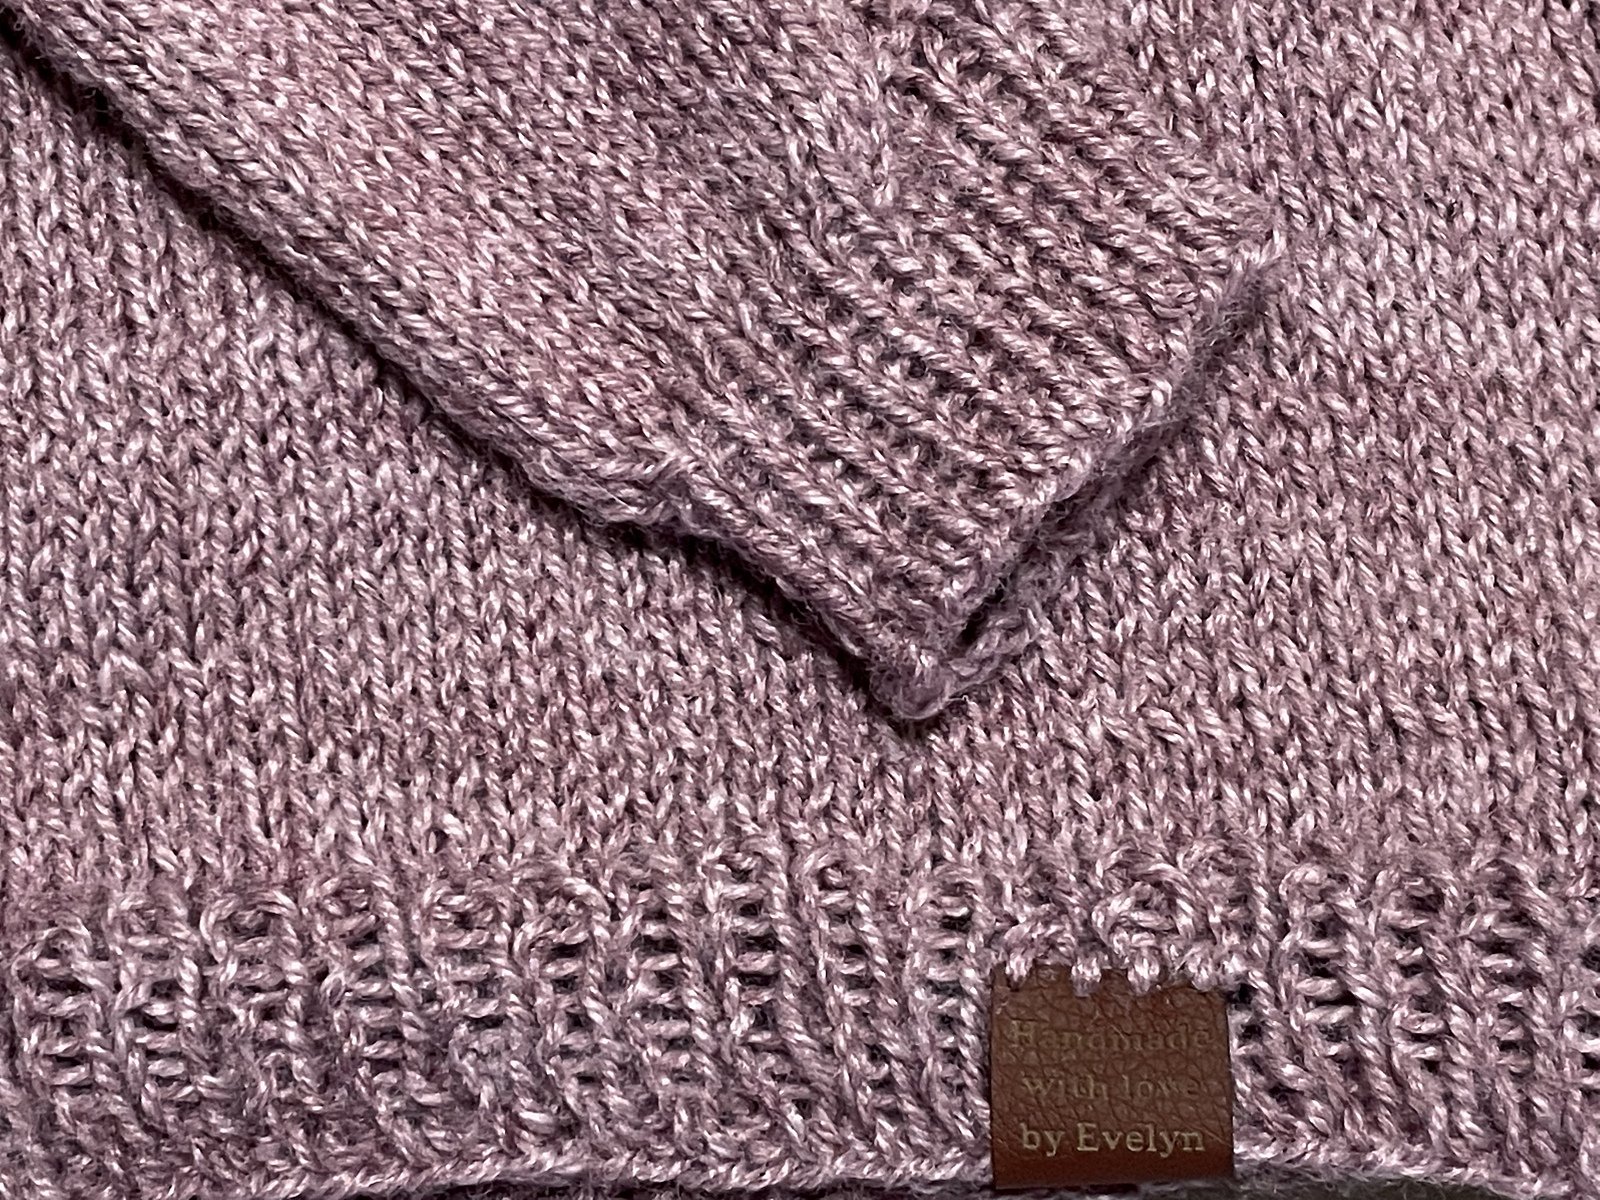
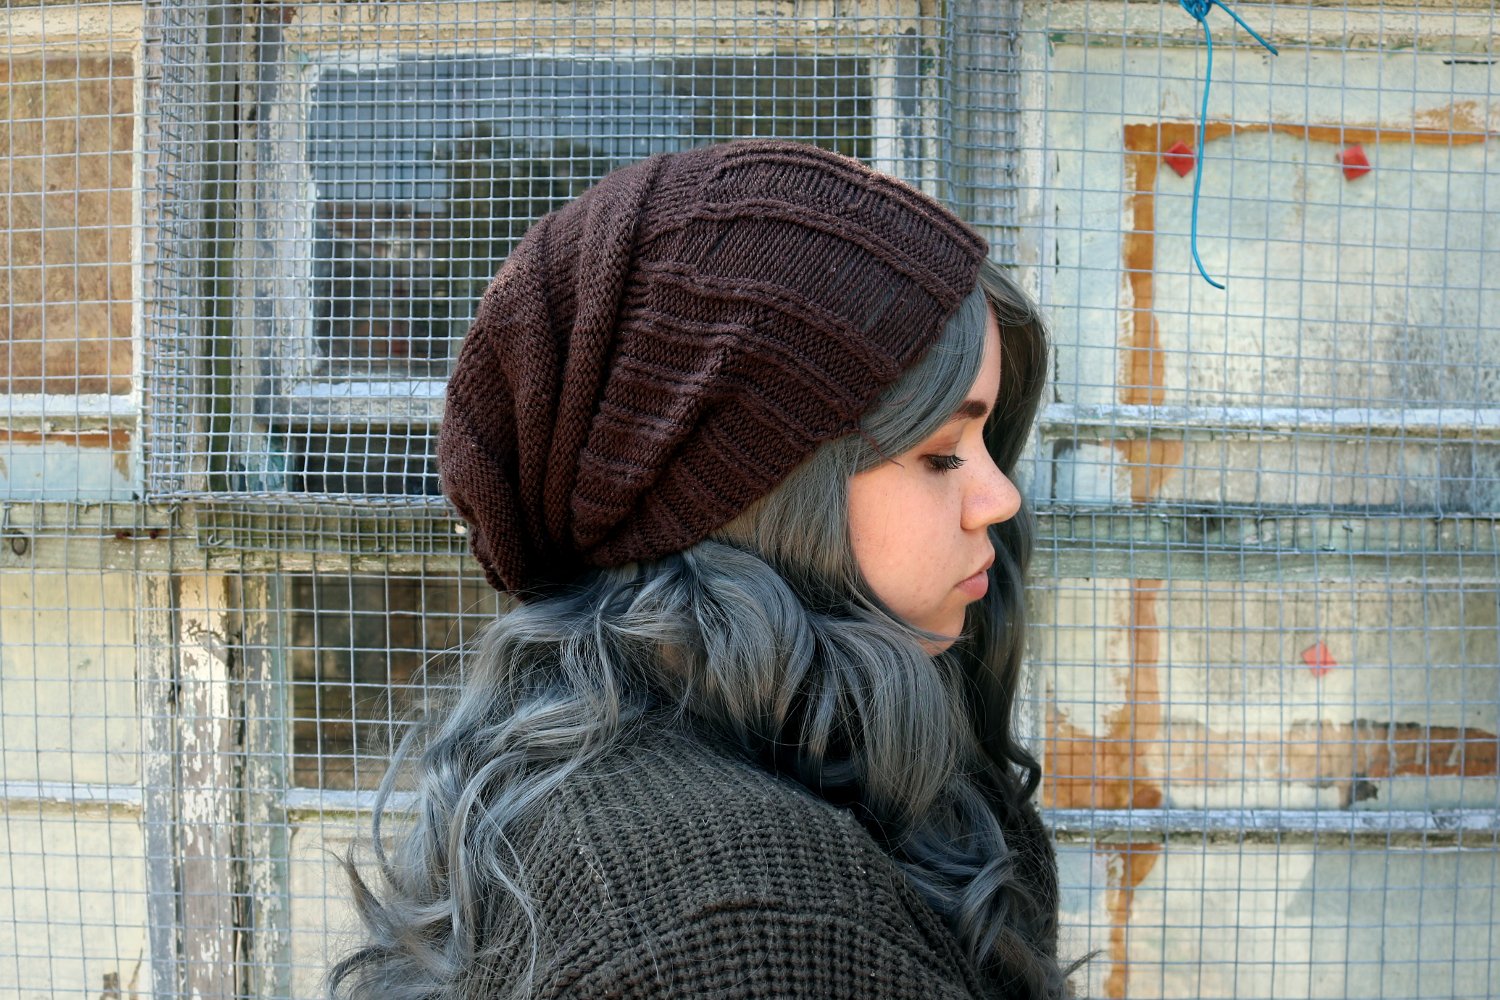
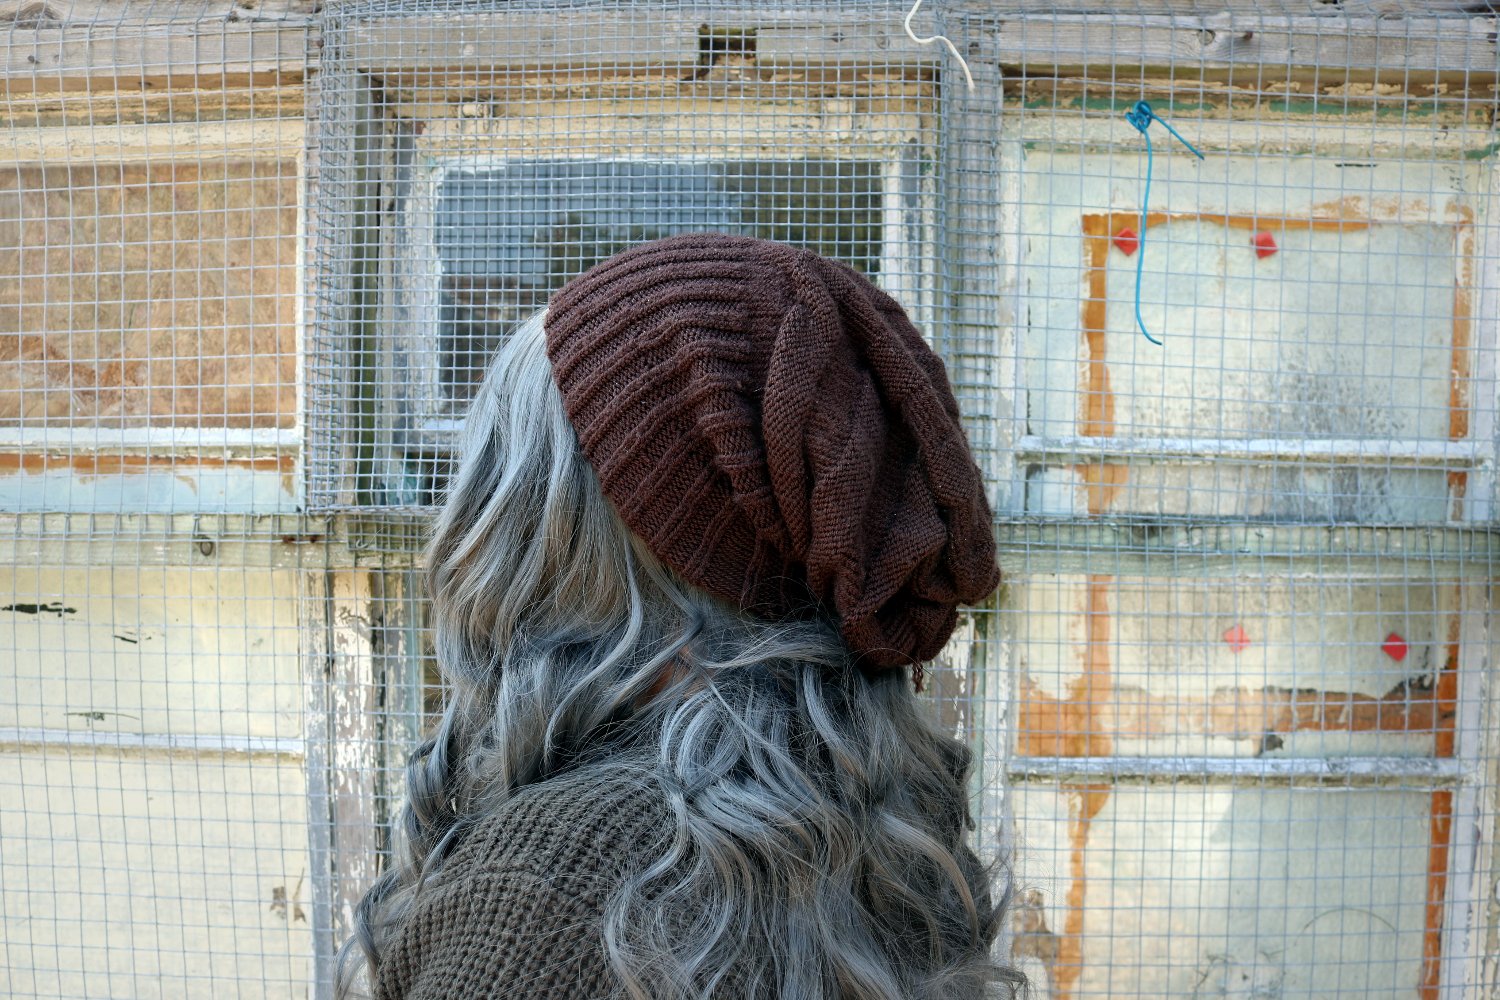
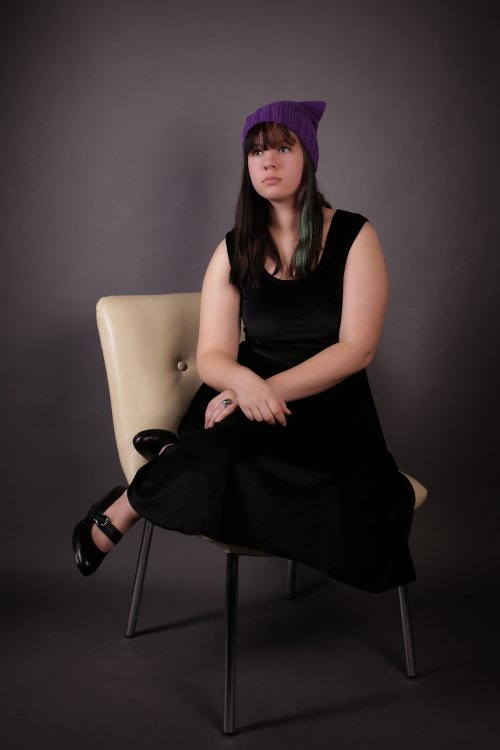
Feels Like Alpaca!
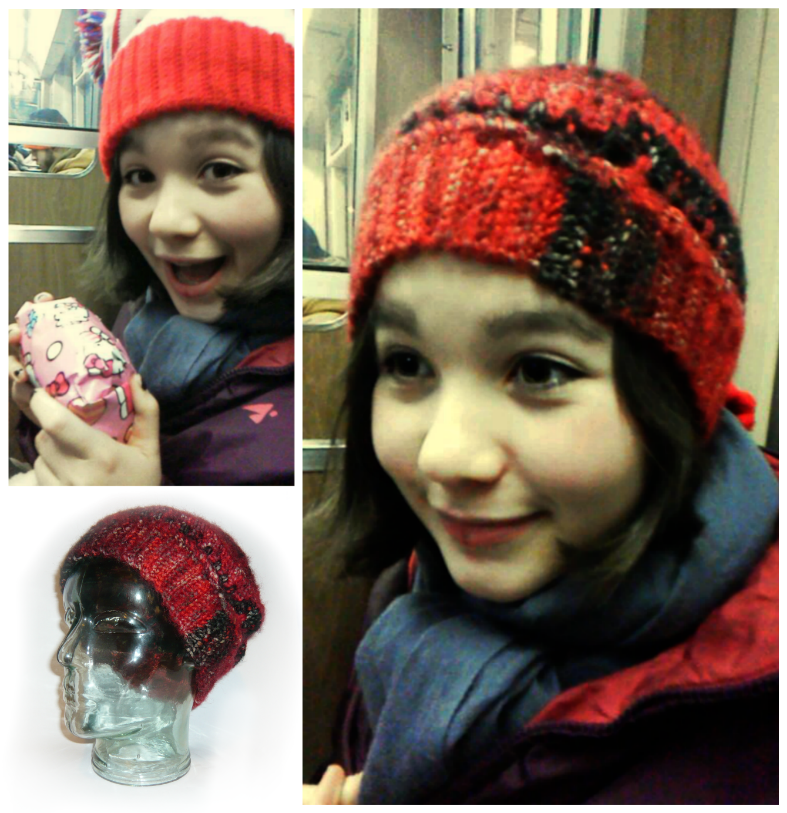
While I was in New Zealand, my girlfriend picked out some yarn so that I could make her parents some hats for Christmas. Something about making winter gear for a summer holiday seemed odd to me but I wasn’t about to pass up a chance to do some knitting! She picked out Lion Brand’s new Feels Like Alpaca in Denim and Rust.
Flax by tincanknits made using Lion Brand’s Re-Spun in Blush
This yarn is new to me, and I also believe new to Lion Brand. I don’t usually go for Lion Brand yarns, although I can be caught admiring the pretty colors in their Mandala line from time to time. The last time I bought Lion Brand, it was their 100% recycled polyester Re-Spun yarn in Blush. That yarn was super pretty - it had a nice drape, good stitch definition, and appears to have held up pretty well in the (machine) wash over time.

Rust


Denim
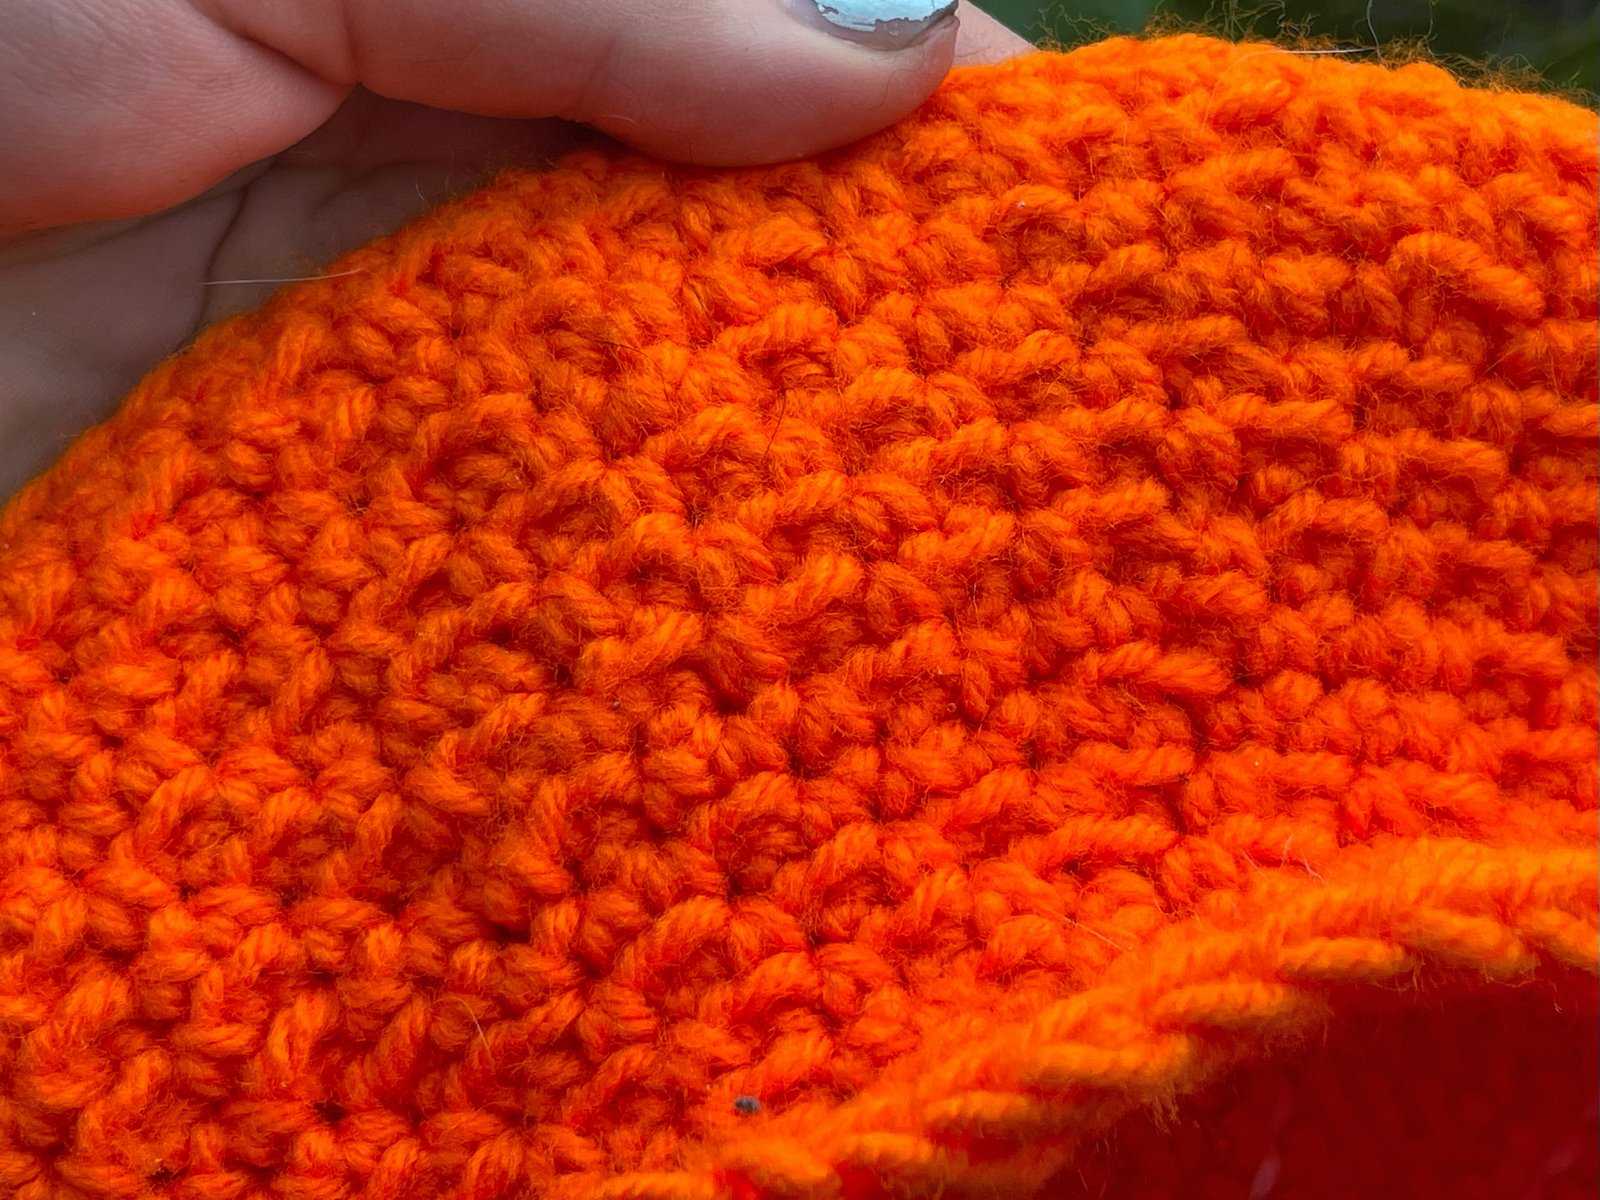
The Lion Brand Feels Like Alpaca yarn is another hit! It feels surprisingly close to alpaca! I think it definitely looks like alpaca, and feels very soft. I’m not sure if it’s just because I touch so much yarn, but it does feel synthetic to me. Without the label, I’d assume it was some kind of alpaca blend. With the label, I know that it is 87% acrylic, 7% polyester, and 6% nylon. It’s also machine washable, which is a big plus in my book!
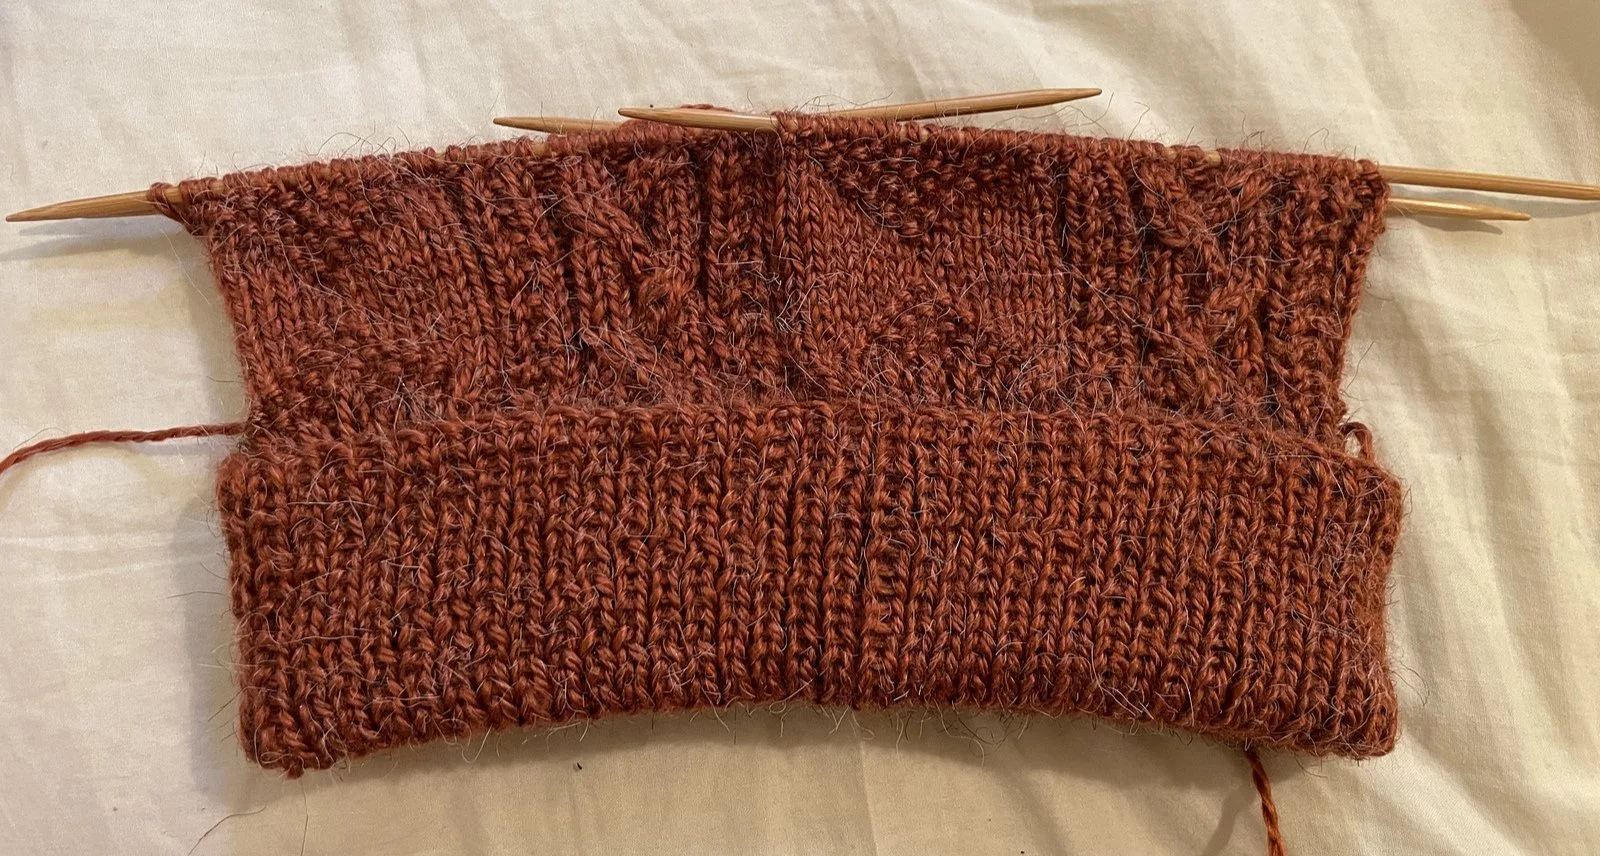
I found this yarn to be a bit slipperier than most synthetic yarns I use, although I found it would catch on the lettering of my DPNs. I used Crystal Palace size 3 (3.25 mm) bamboo needles for the entirety of both of the hats that I made. I found that it was fairly easy to undo stitches, but was a bit prone to being split with a knitting needle while working with it. Despite the yarn being fuzzy I still felt the stitch definition was pretty good - better than most alpaca I’ve worked with. I assume this has something to do with the synthetic nature of the fibers.

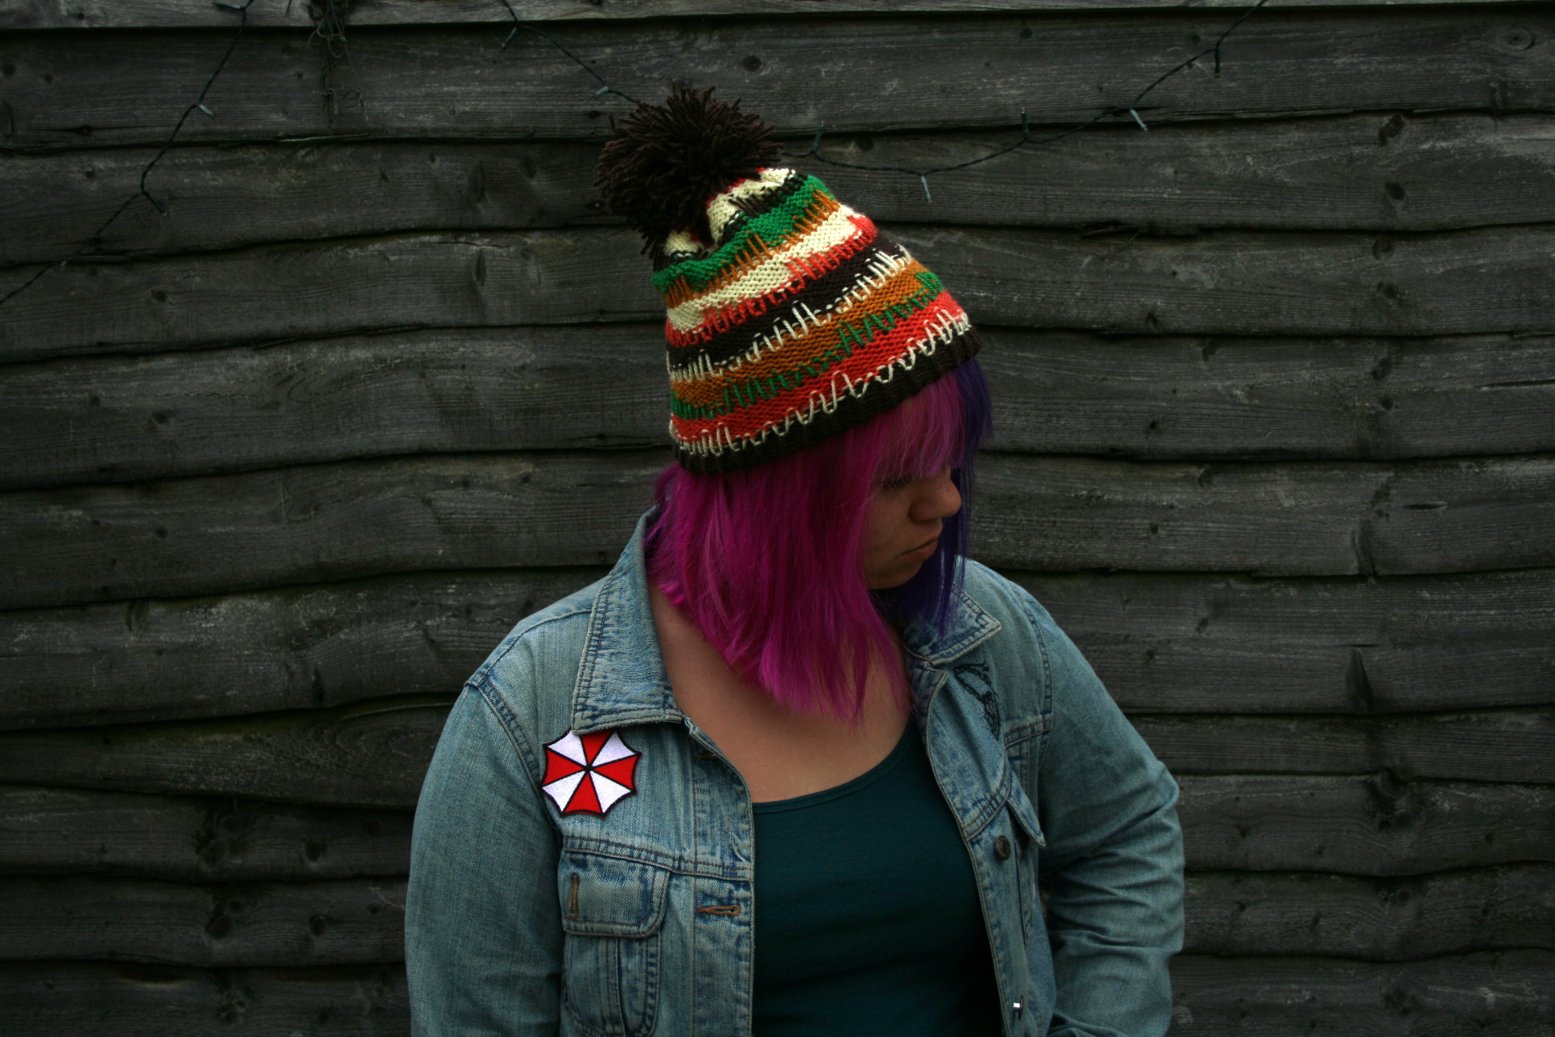
Rainbow Indigo Fisherman's Beanie by Janet Stimson made using Lion Brand’s Feels Like Alpaca in Rust

Cengkeh Beanie by Amelia Putri made using Lion Brand’s Feels Like Alpaca in Denim
Would I buy it again? Probably! I really like the feel and look of this yarn, and I do like the Burgundy colorway a lot! The only issue I’m seeing is that the color palette isn’t super varied. Every color is gorgeous, but I would love to see a green, or a brown, or more of a true red or purple. If there was a dark slightly desaturated purple it would already be in the mail on its way to me.

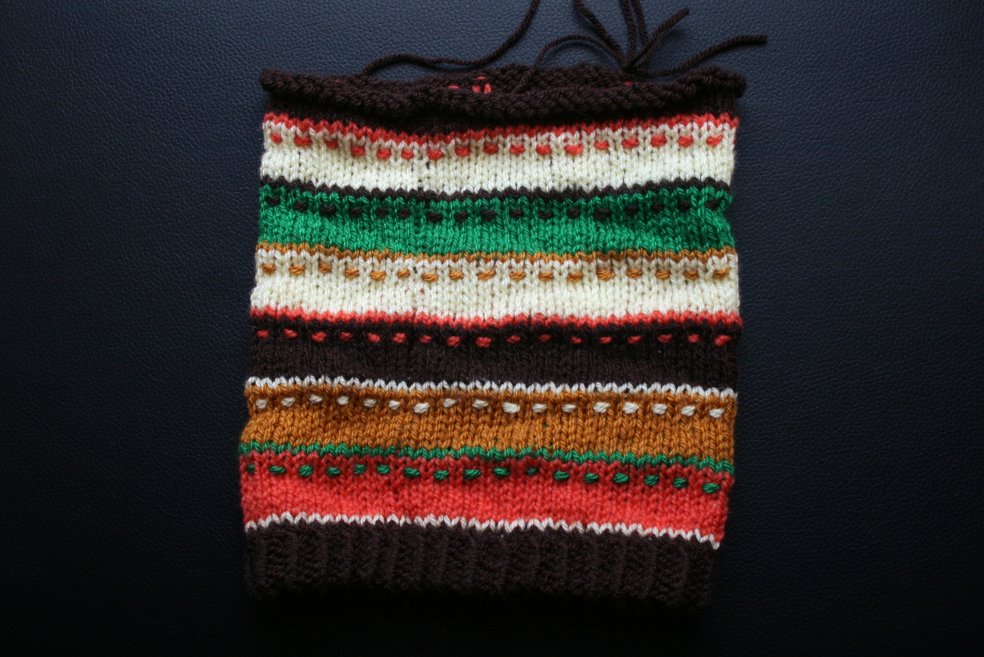
Bonus hat for the girlfriend made using Lion Brand’s Feels Like Alpaca in Rust and Denim
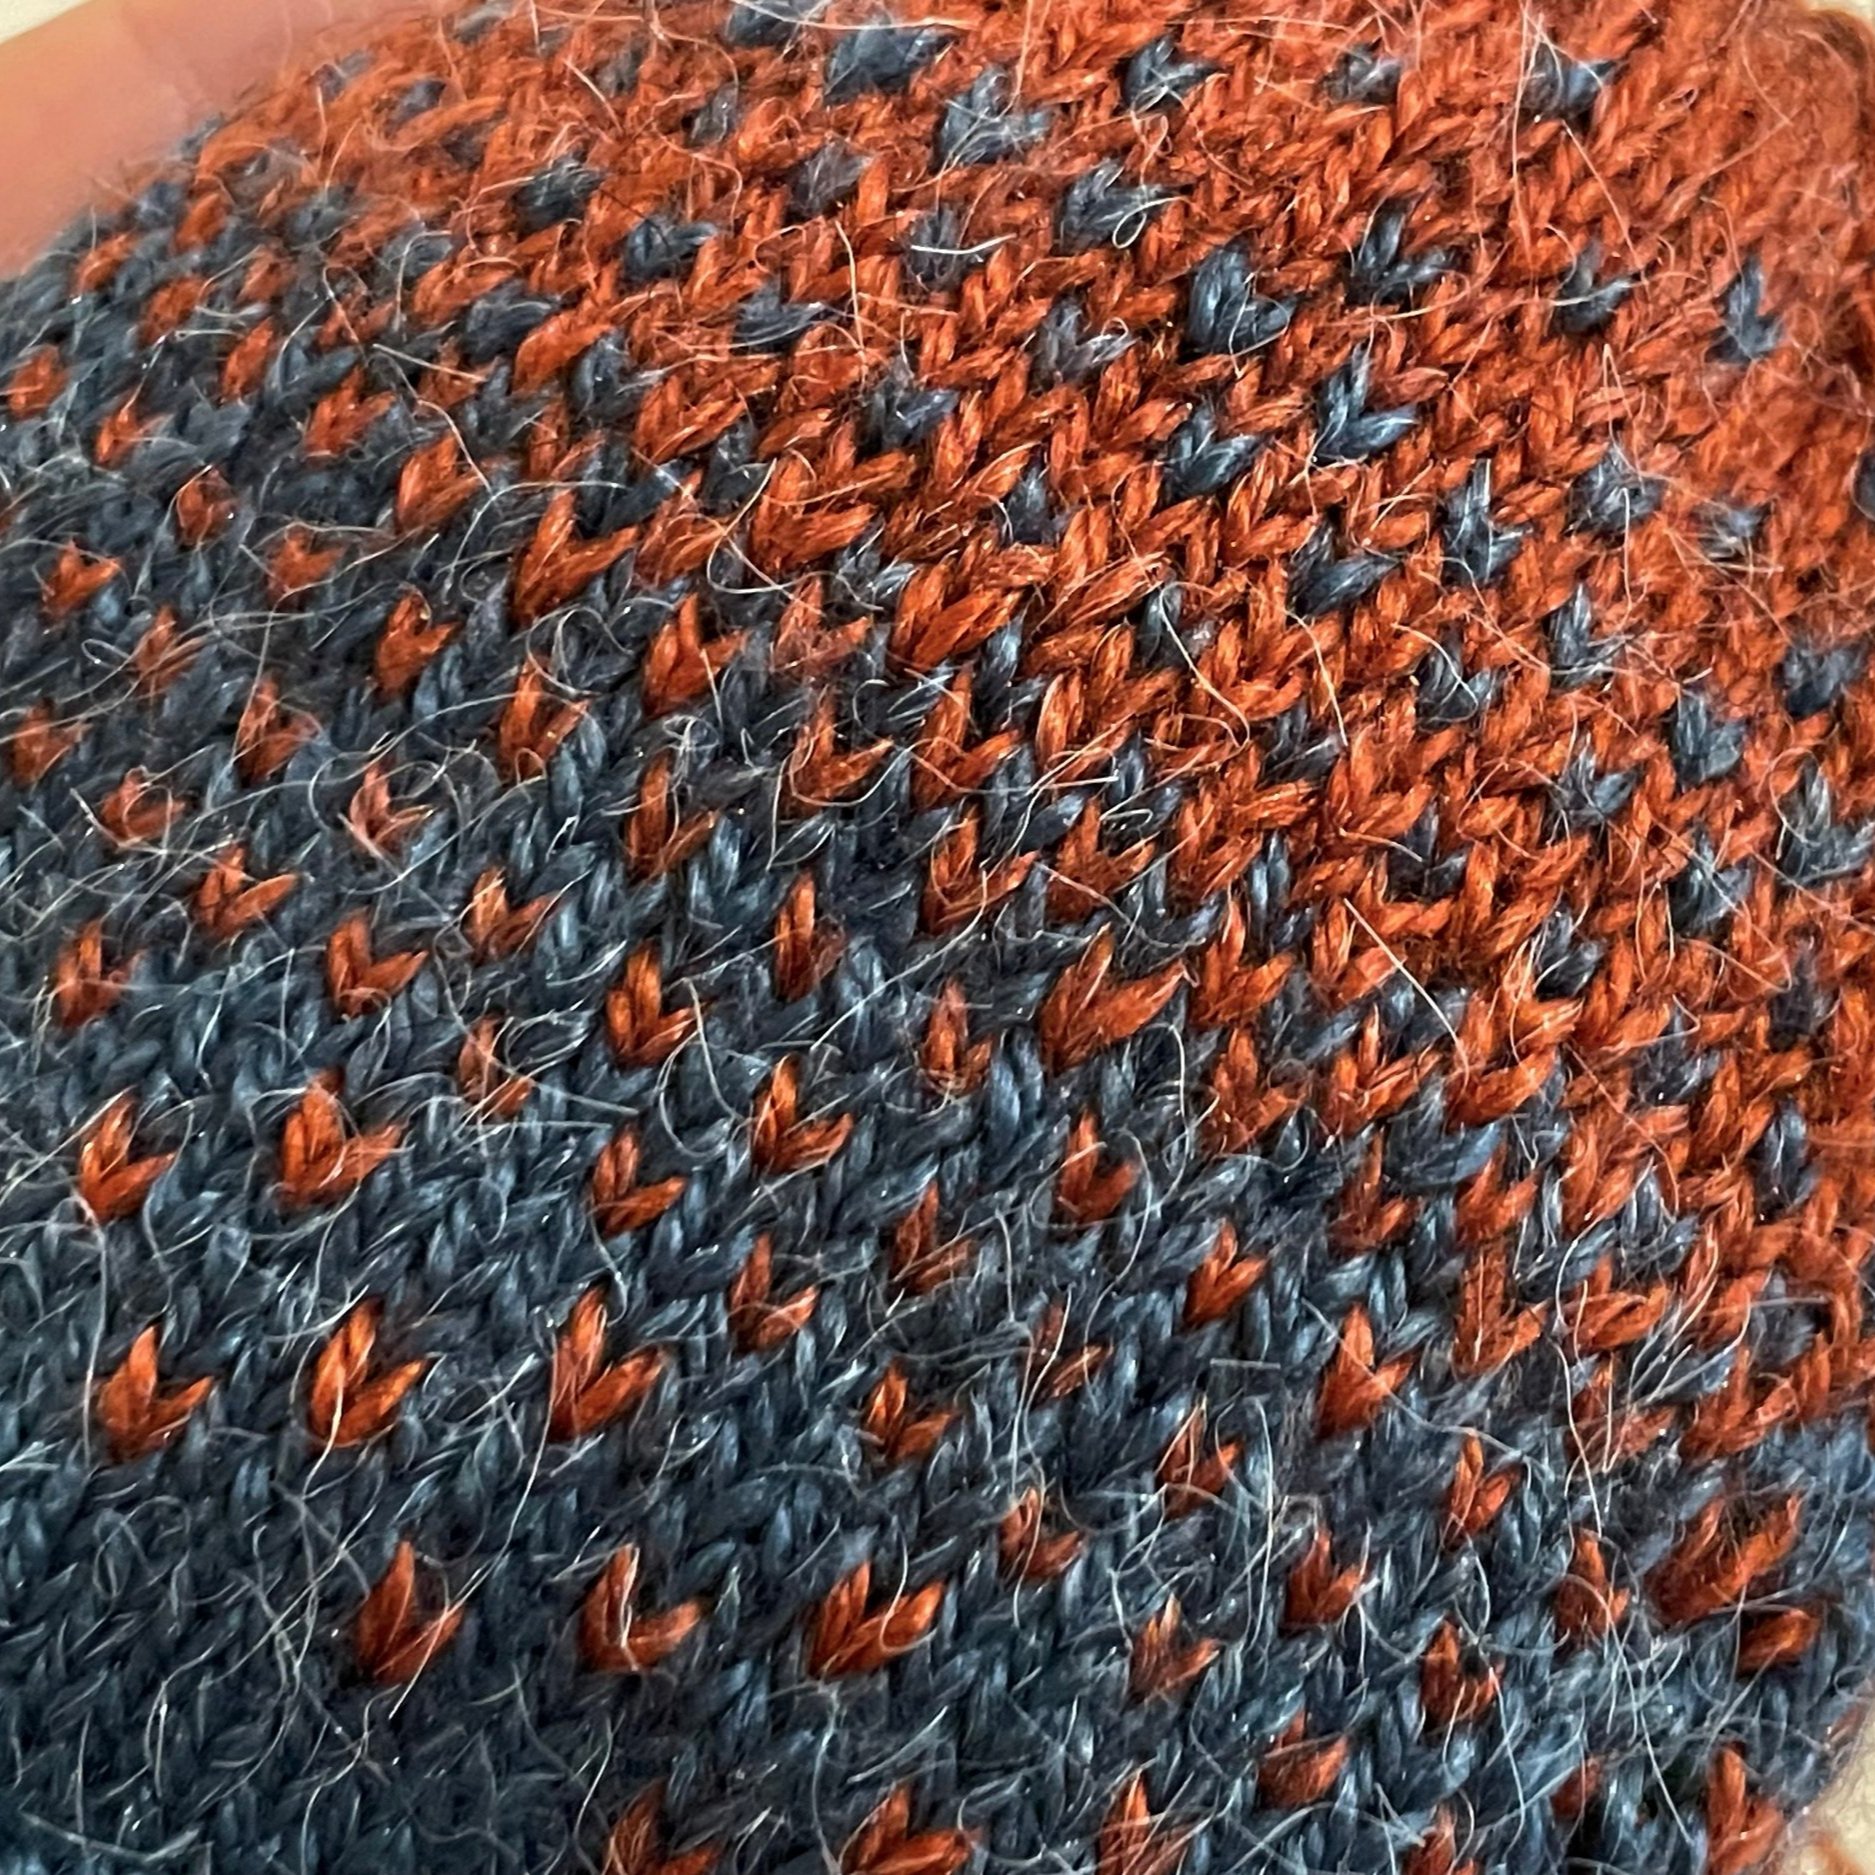
This hat is mostly my own pattern, but uses the colorwork chart from The Easy Ombre Slouch Hat by Paul S Neary
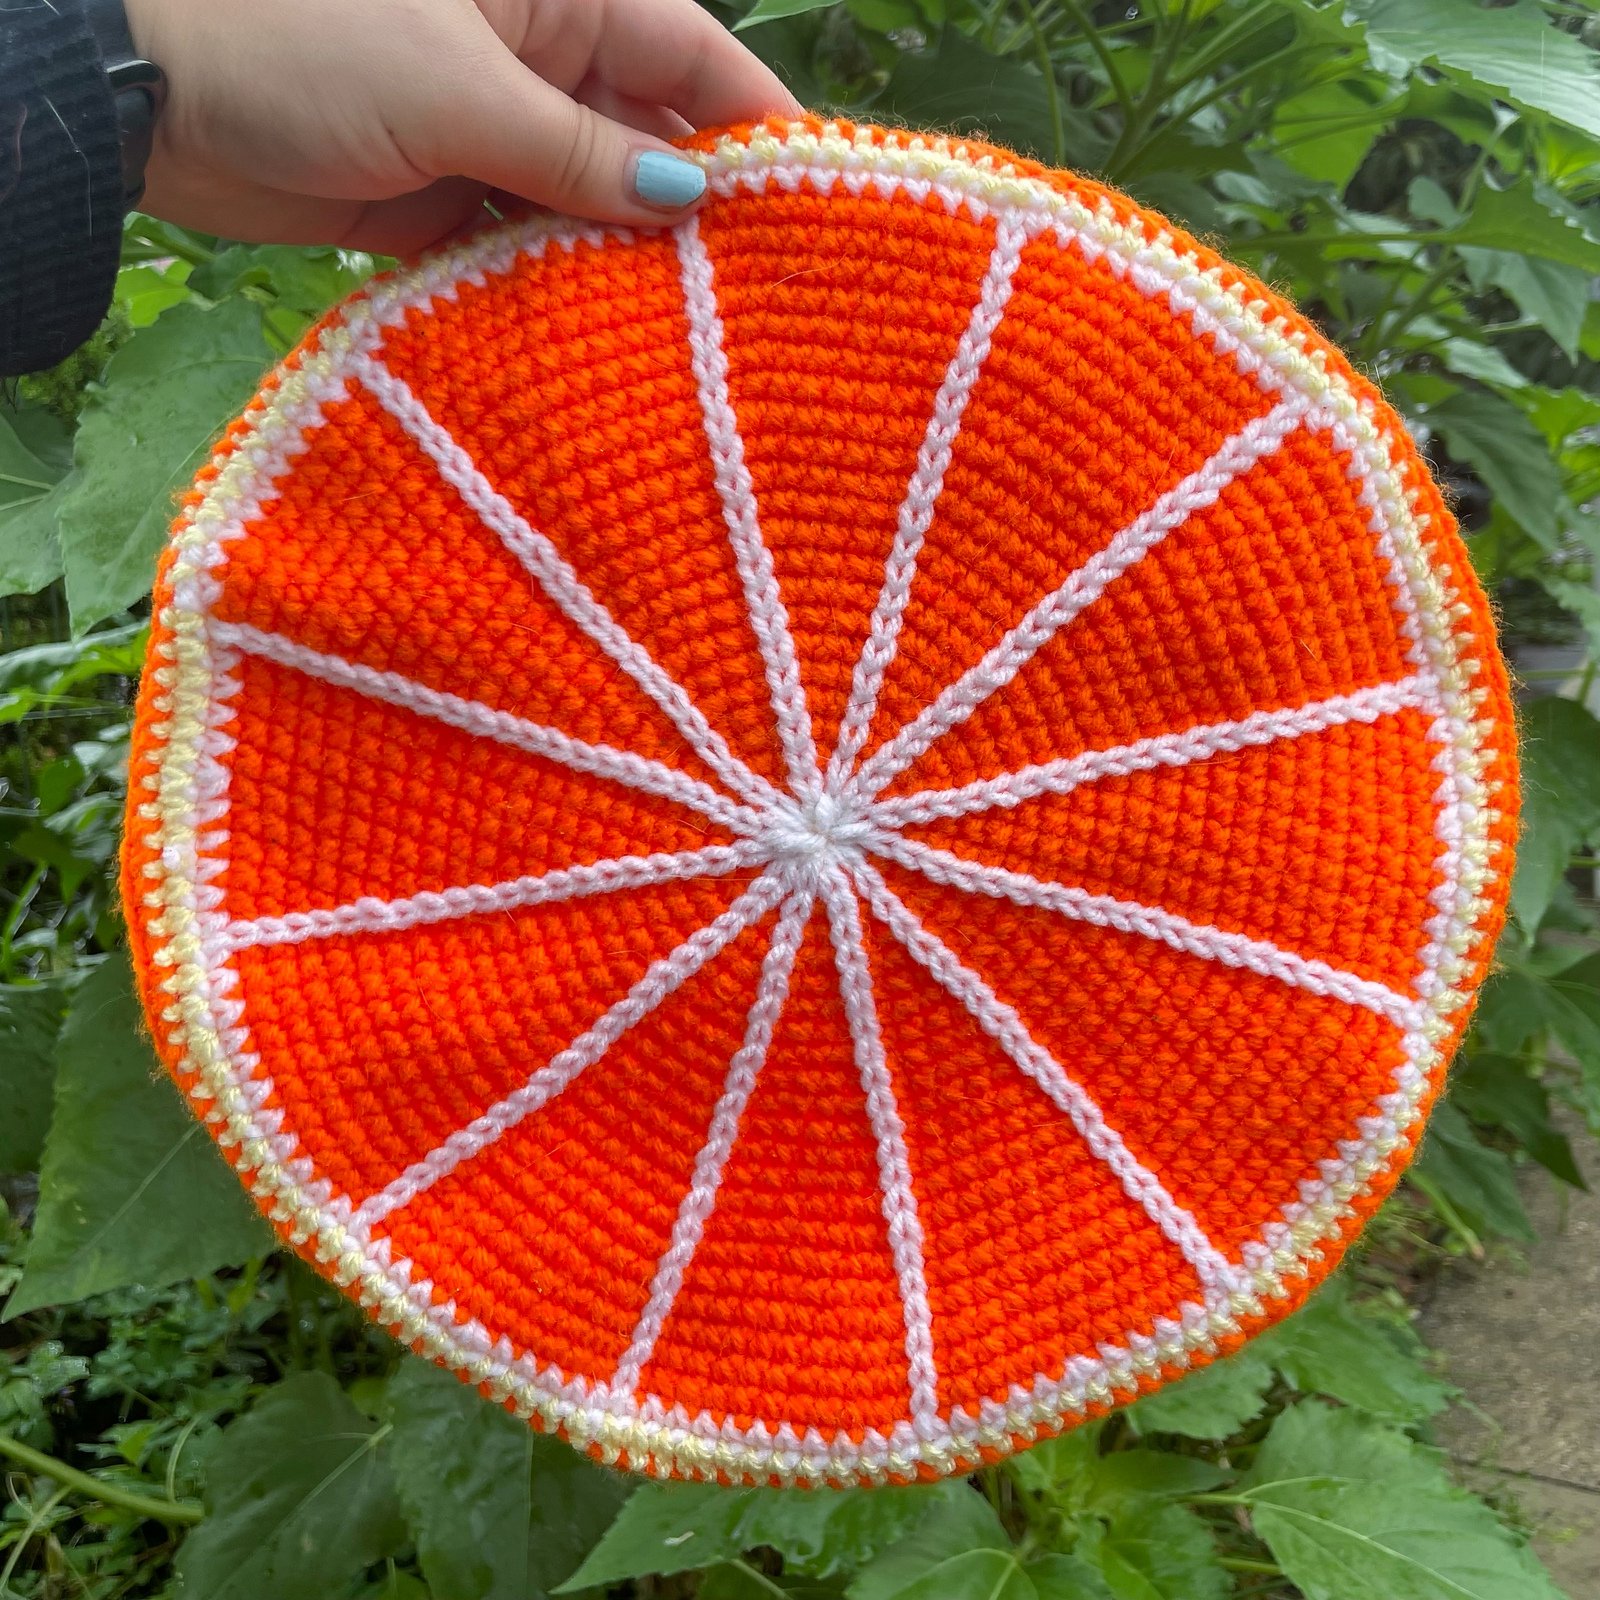
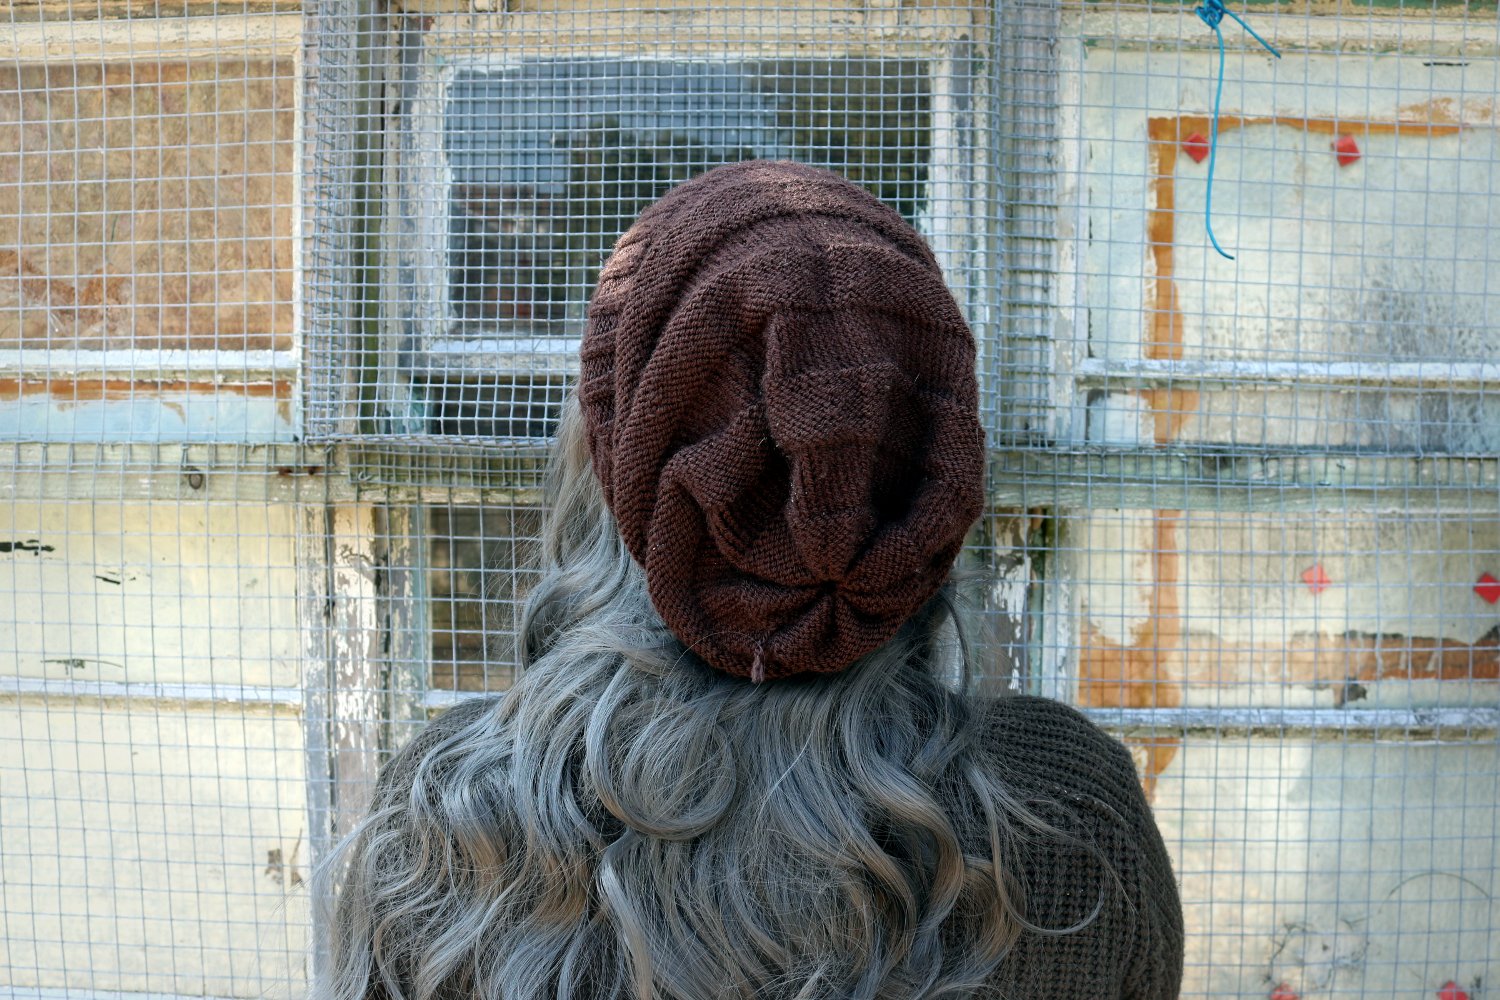
Citrus Beret

New Pattern Alert!!
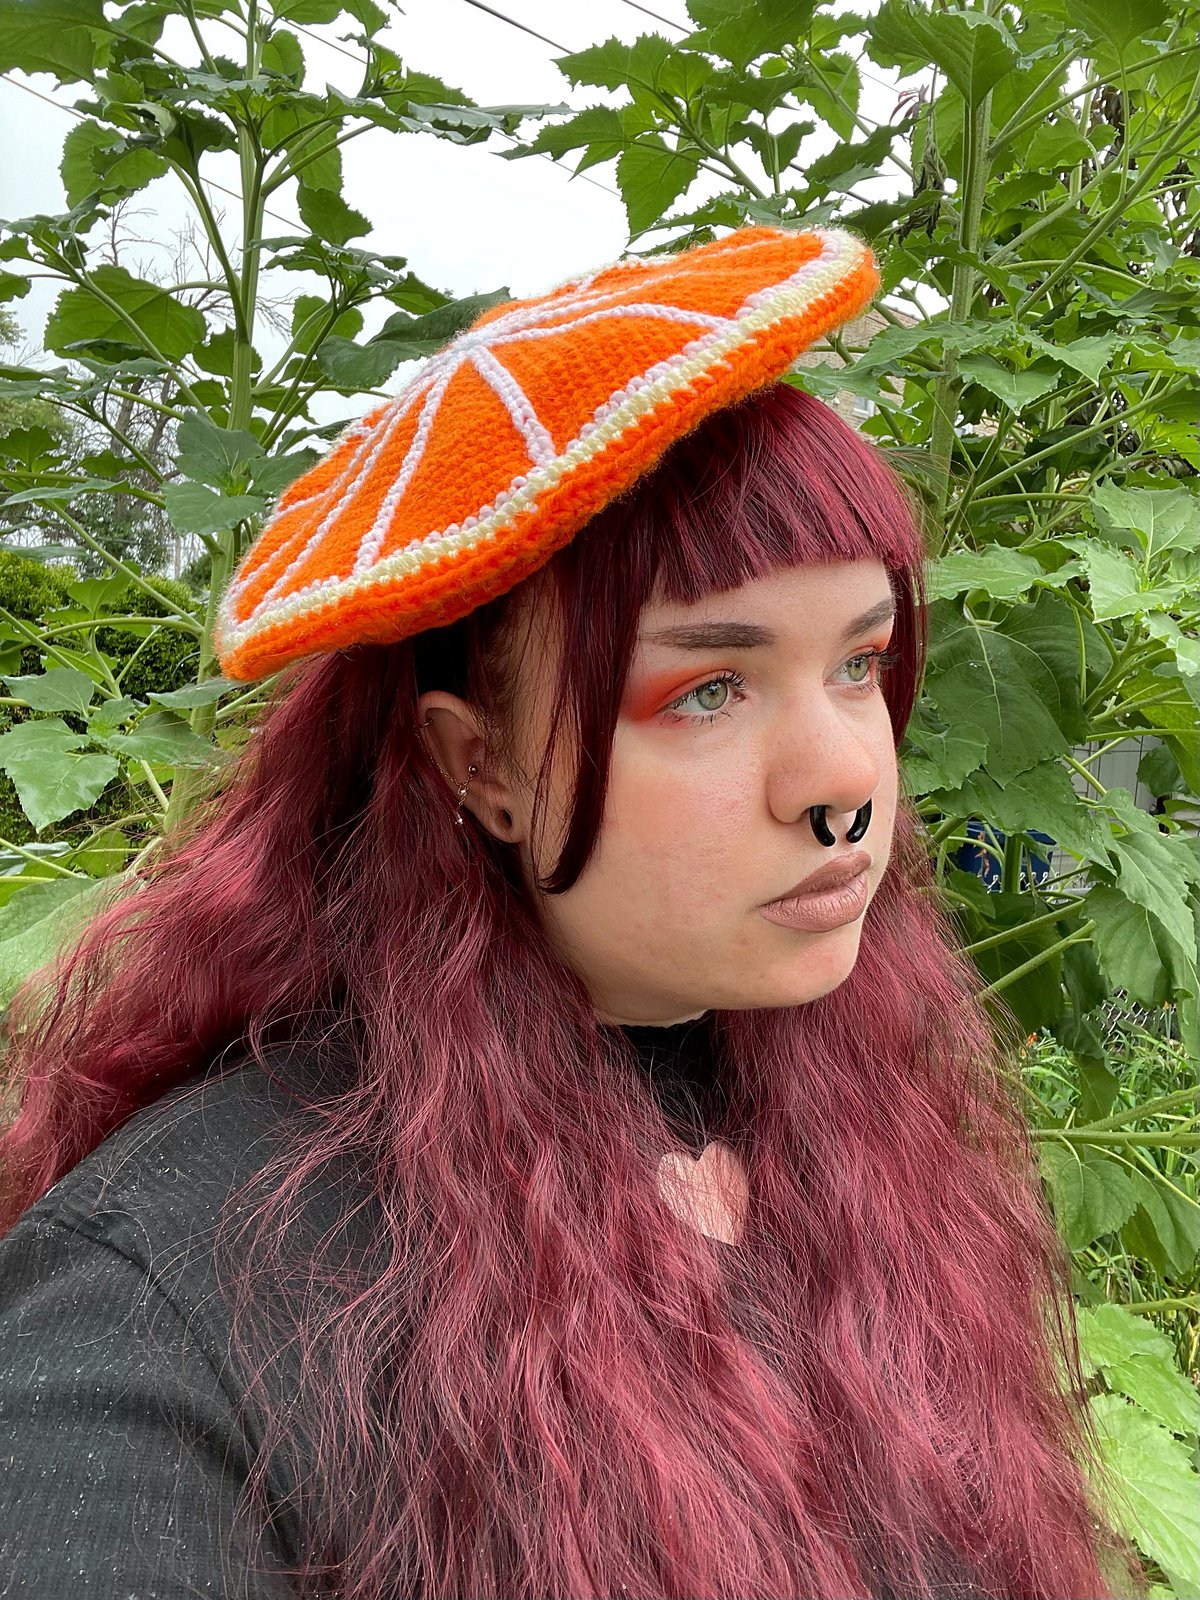
The Citrus Beret is based on, well, citrus! This hat features a segmented design reminiscent of the inside of a sliced citrus fruit, with a textured underside meant to evoke the peel.
This hat is worked in the round, some details are worked directly onto the top of the hat, no sewing required!
Mushroom Beret Hat Pattern
First thing's first:
Happy New Year!


One of the last things I did in 2021 was make and design this Mushroom Beret. This is definitely in my top three designs of 2021. I made this hat using two colors of yarn and fairly simple stitches.

I've had the idea to make a Mushroom Beret for a while, but was only able to focus on this project recently. This beret’s design was inspired by amanita muscaria, or the fly agaric mushroom. One of the things that was super important to me was the look of the "gills" on the bottom of the hat. I managed to achieve what I was looking for in just a few days, and then patterned it and have uploaded it to Ravelry!

As always, thank you for reading, and be sure to share your projects when you're done!
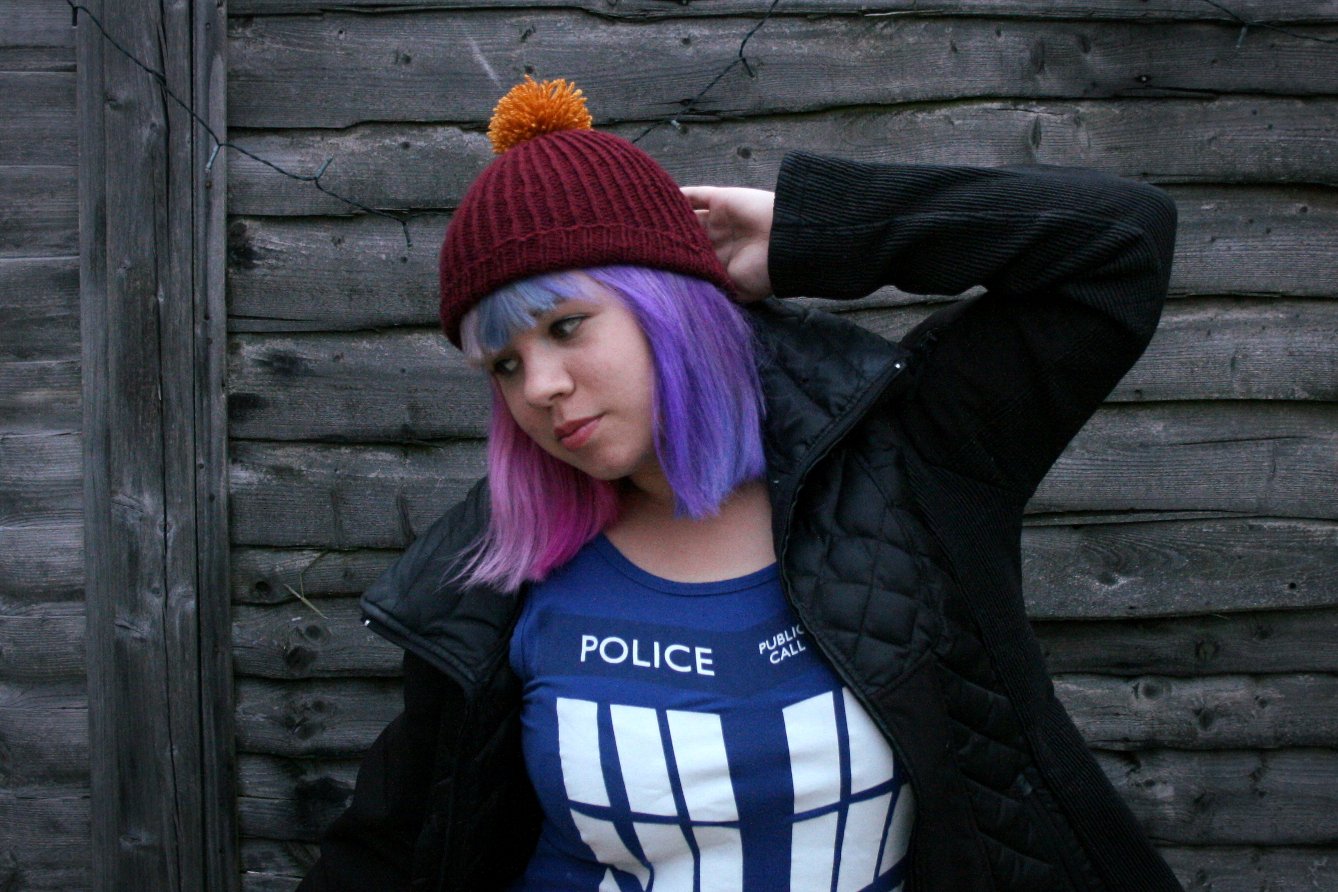
Razor's Hat from World Enough and Time
I was recently asked to make Razor's Hat from the Doctor Who episode World Enough and Time. I wrote up a pattern just in case anyone else was interested in making one for themself!What you'll need:
US size 6 needles (4.0 mm)
Double knit yarn


I used Stylecraft Special DK in Dark Brown Shade 1004I found that if you want to make your hat distressed in a similar way to the show, it is easier to prevent unraveling if you create the distressing as you go. I've included two versions of the hat, one with distressing and one without.
Unfamiliar terms explained:
DSPU: drop stitch and pull out stitches all the way to the brim, pick up a stitch on your left needle, ready to be worked as the next stitchCO 112 stitches in the round
With Distressing
Row 1-17: (K2, P2) 28 times
Row 18: (K2, P2) 2 times, K2, DSPU, P2, (K2, P2) 25 times [112 st]
Row 19-20: (K2, P2) 28 times
Row 21: K112
Row 22-33: (K2, P2) 28 times
Row 34: (K2, P2) 17 times, K2, DSPU, P2 (K2, P2) 10 times [112 st]
Row 35-40: (K2, P2) 28 times
Row 41: (K2, P2) 16 times, K1, DSPU, K1, P2 (K2, P2) 11 times [112 st]
Row 42-47: K112
Row 48: K71, DSPU, K 41 [112 st]
Row 49-51: K112
Without Distressing
Row 1-20: (K2, P2) 28 times
Row 21: K112
Row 22-41: (K2, P2) 28 times
Row 42-51: K112
Both Versions
Row 52-61: P112
Row 62-71: K112
Row 72-81: P112
Row 82-91: K112
Row 92-101: P112
Row 102-111: K112
Row 112-120: P112
Row 121: K2tog [56 st]
After working the last row, pull a piece of yarn through and pull as tight as possible. Weave in your ends and your hat is complete!
Nardole from Doctor Who

On the second day of London MCM, I wore a cosplay of Nardole from the Doctor Who episode Eaters of Light. I'm starting with the second day because I neglected to get pictures of the costume I wore the first day, but hopefully I'll get some soon.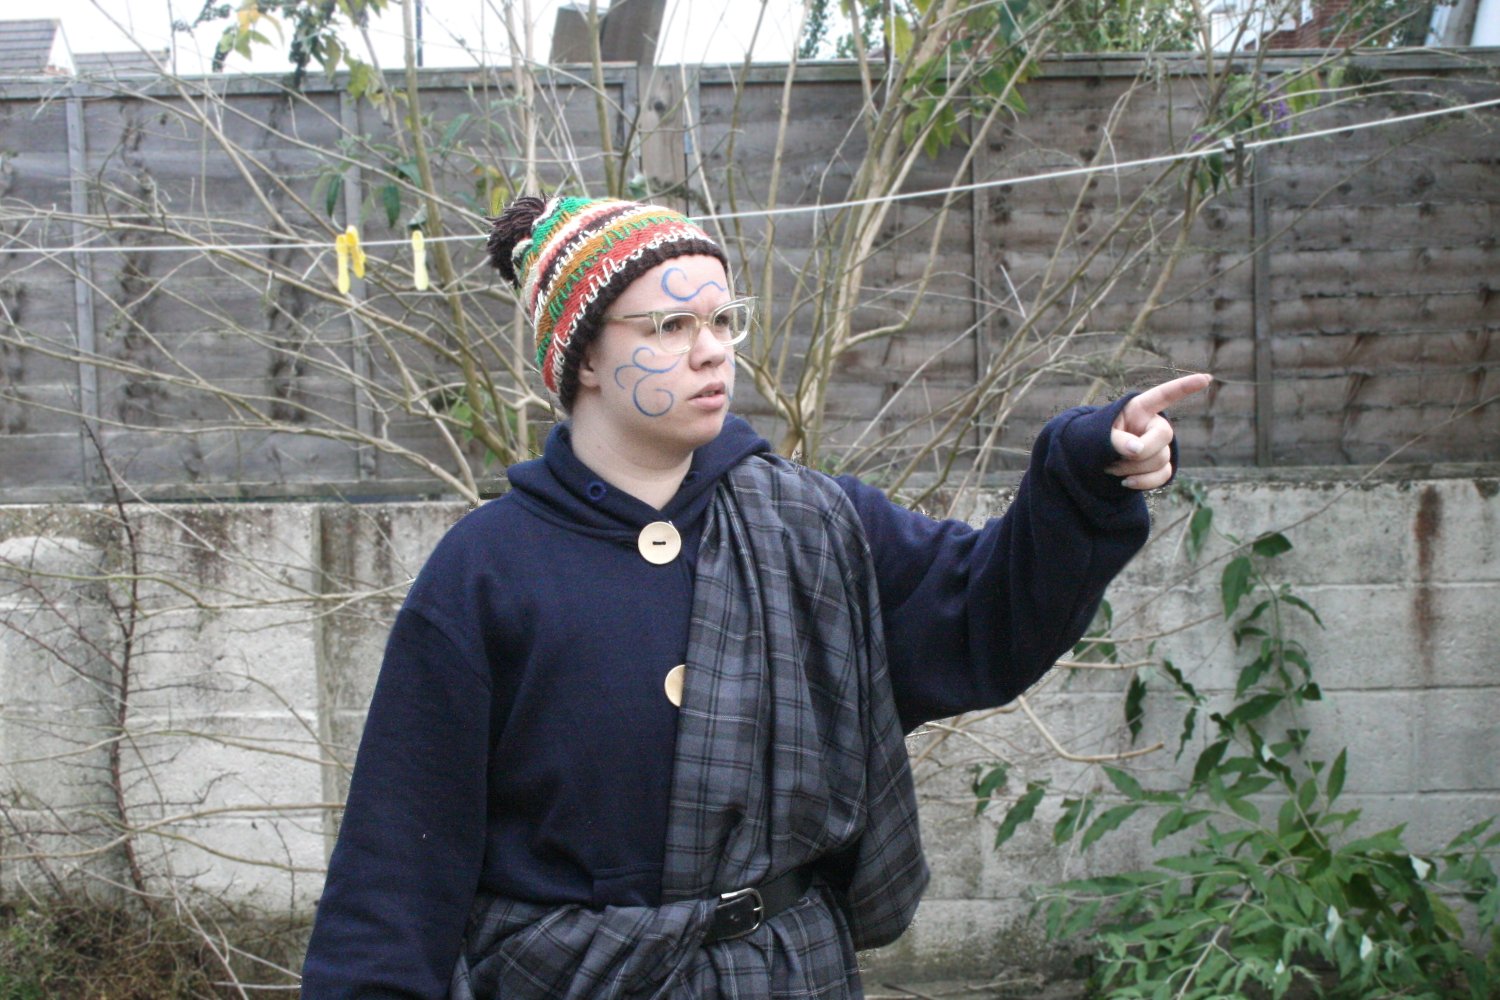 The Nardole costume consisted of a hand knit hat, a sweatshirt, pajama pants, and a kilt. The kilt was simply a huge piece of fabric with serged edges. Unlike how the kilt is worn in the show, I wore mine the same way that one would wear a great kilt.
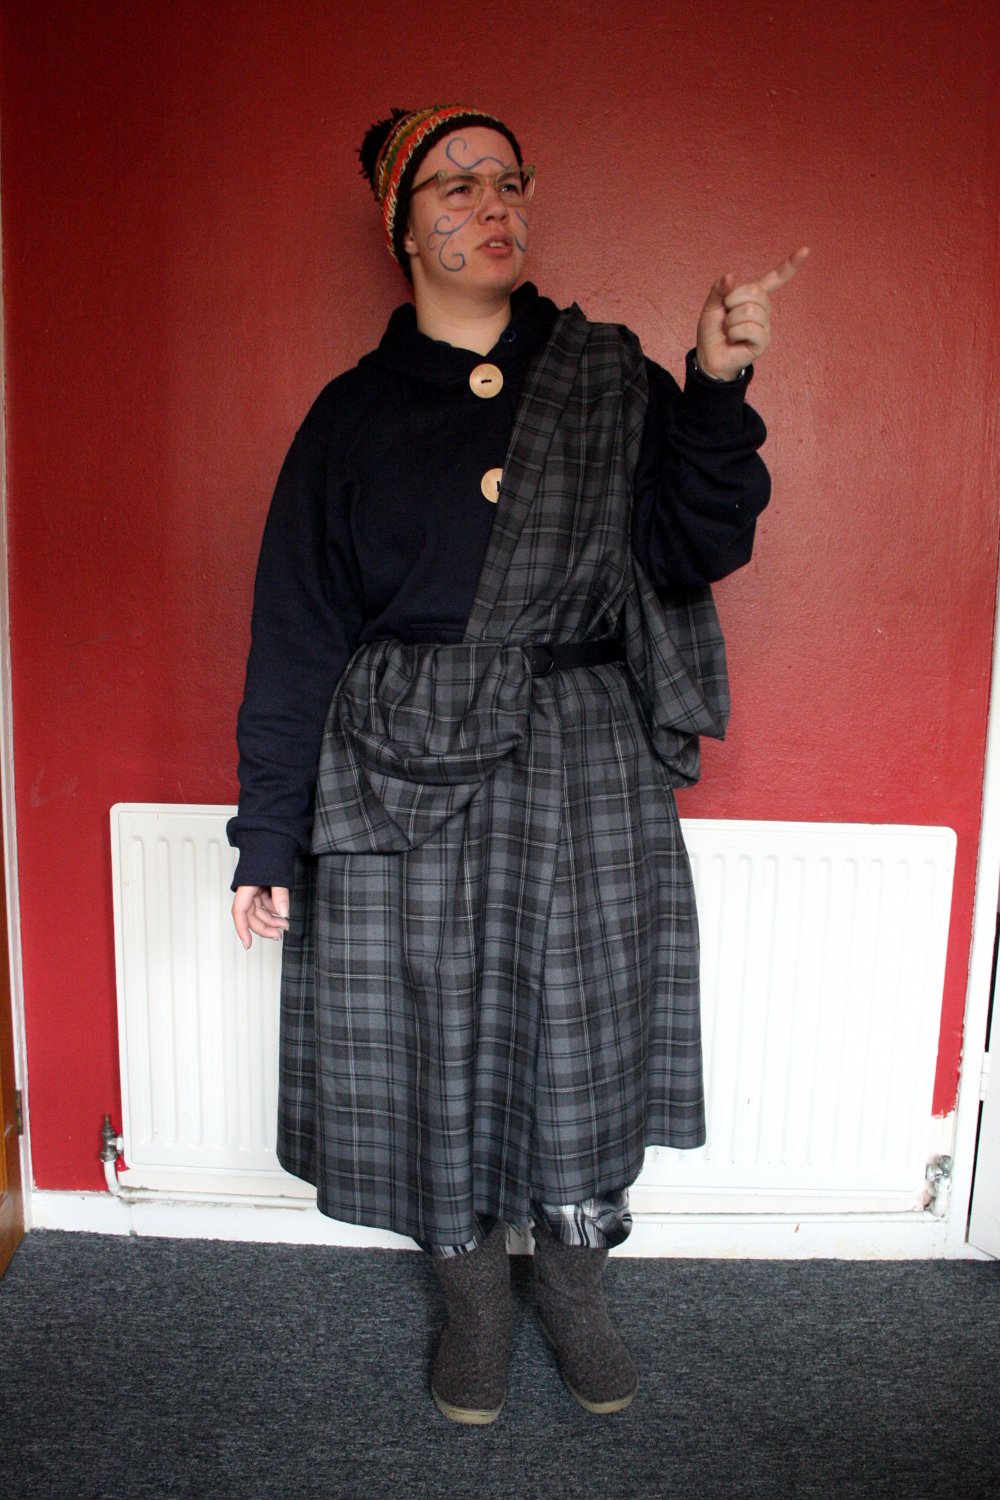 Since the sweatshirt was fairly simple in design, I opted to modify a blue zip up sweatshirt I already had instead of making one from scratch. I started by taking out the zipper and the hoodie cord. Then, I added buttonholes and large wooden buttons down the front of the hoodie. Even though I'd taken out the bright white hoodie cord, the eyelets in the hood were still visible in bright silver, so I buttonhole stitched all the way around them.
 The hat I wore is one I've already posted about, and have actually written up a pattern for, so be sure to check that out!This is, by far, one of the most comfortable cosplays I have ever worn. I basically got to walk around in pajamas all day, it was great!
Wilf's Hat from The End of Time

After knitting two of Nardole's hats, I felt as though I needed more hats. Why? I don't know, I can't possibly find the time to wear them all if I keep making them at this speed! This hat is Wilf's hat from the Doctor Who episode The End of Time. I remember when I first watched the episode I noticed the hat, but I didn't think I'd end up making it because it looked so complex. Fast forward to a few months later, and I've knitted up the hat! I found a this lovely pattern by Patricia Schönhold on Ravelry. It was my first time knitting from a chart, as well as my first time knitting bobbles. The pattern was easy to understand, and I had no problems with any of it.
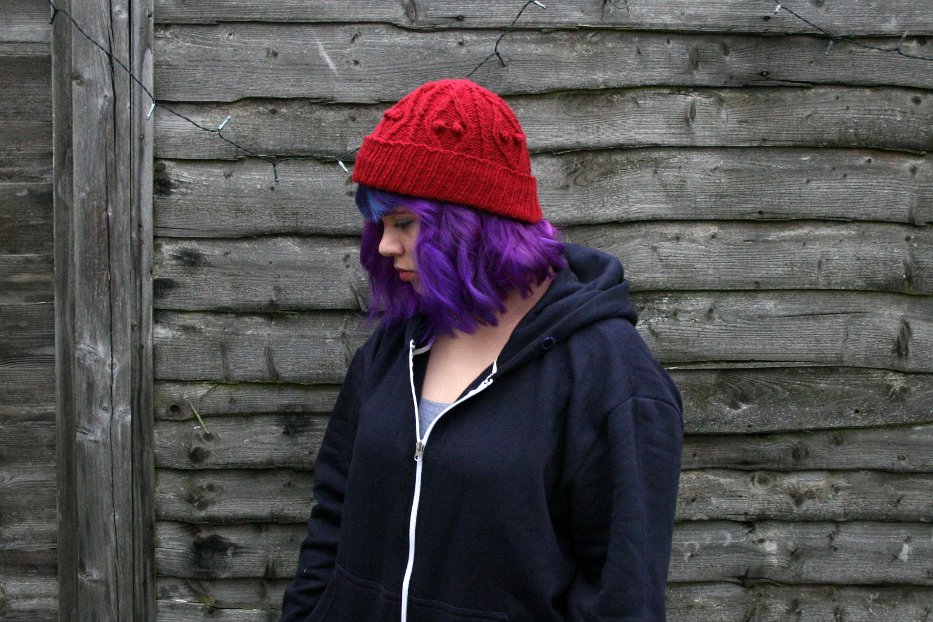 I knitted this hat up with Stylecraft Special DK in Lipstick (this might be wrong, I've lost the label) with size 8 (5.0 mm) knitting needles. I realize I've used Stylecraft in most of my recent projects. That's because Stylecraft is really easy for me to get and it comes in a huge number of colors.
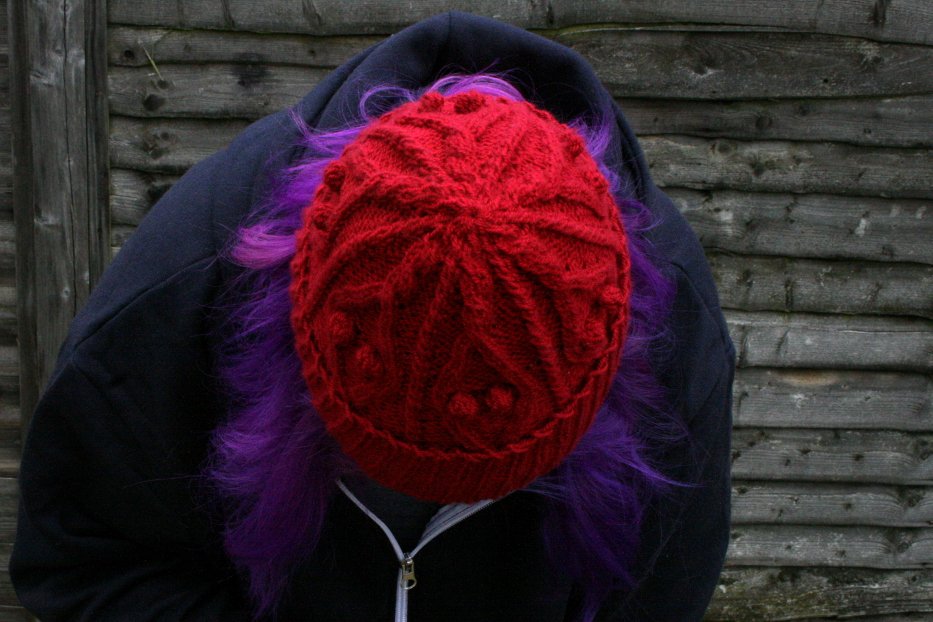 I did end up changing the pattern just a bit. Near the crown of the head, I added two extra twists in the large cables. Because of this, the number of stitches I had on my needles did not match up with the pattern and I ended up decreasing differently. I don't remember exactly what I did, but the difference is visible.
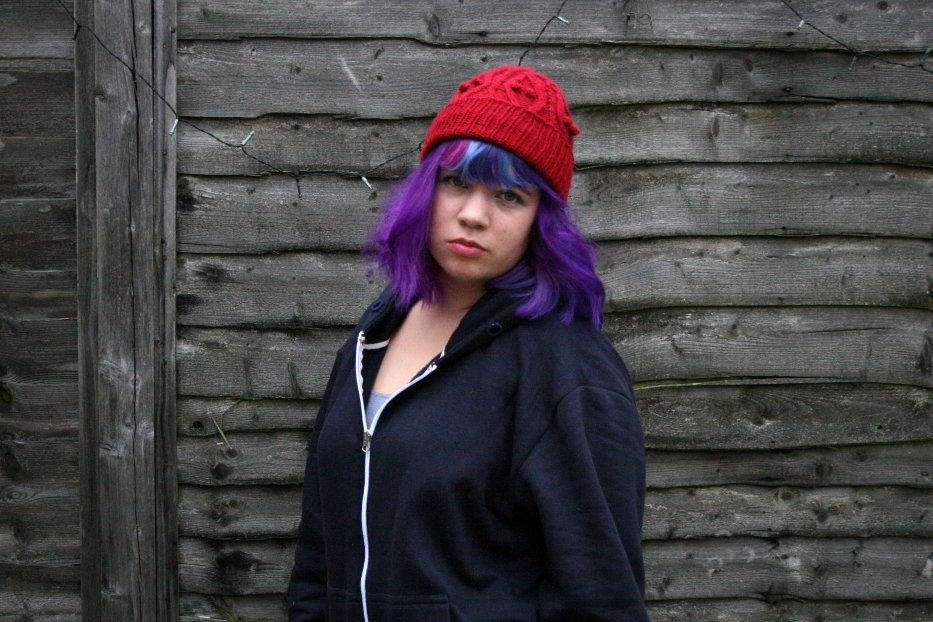 I'm very happy with Wilf's hat, and I definitely wouldn't have been able to make it without the pattern I found. I am glad that Patricia Schönhold put this pattern up, and I would recommend it to anyone else looking to make Wilf's hat.
Nardole's Hat from The Doctor Falls
nardole hat side 2

front nardole hat
That's right! I made another one of Nardole's hats! This one is from last week's Doctor Who episode, The Doctor Falls. It was super simple to make compared to the last one!Even though I'm very happy with how my hat turned out, the pattern I've put at the bottom of the post is slightly different from the hat pictured here. This is because the one I made is small (it fits my head, but it might not fit yours), and I mistakenly made my hat a bit too short.What you'll need:
US size 8 needles (5mm)
Double knit or worsted weight yarn
side of nardole hat
I used Stylecraft Special DK in 1035 Burgundy and 1709 Gold.
Cast on 96 st, k1, p1, all the way around for 9 inches, then work the following rows:
It may help to divide your stitches into 6 equal sections of 16 stitches
Row 1: *p2tog, k1, p1, k1, p1, k1, p1, k1, p1, k1, p1, k1, p1, k2tog tbl, repeat from * (total of 84 stitches)
Row 2: p1, k1, all the way around
Row 3: *k2tog, p1, k1, p1, k1, p1, k1, p1, k1, p1, k1, p2tog tbl, repeat from * (total of 72 stitches)
Row 4: k1, p1, all the way around
Row 5: *p2tog, k1, p1, k1, p1, k1, p1, k1, p1, k2tog tbl, repeat from * (total of 60 stitches)
Row 6: p1, k1, all the way aroundRow 7: *k2tog, p1, k1, p1, k1, p1, k1, p2tog tbl, repeat from * (total of 48 stitches)
Row 8: k1, p1, all the way around
Row 9: *p2tog, k1, p1, k1, p1, k2tog tbl, repeat from * (total of 36 stitches)
Row 10: p1, k1, all the way around
Row 11: *k2tog, p1, k1, p2tog tbl, repeat from * (total of 24 stitches)
Row 12: k1, p1, all the way around
Pull the yarn tail through remaining stitches, pull tight, and secure ends.
All that's left is to add your pom pom on top and you're done!
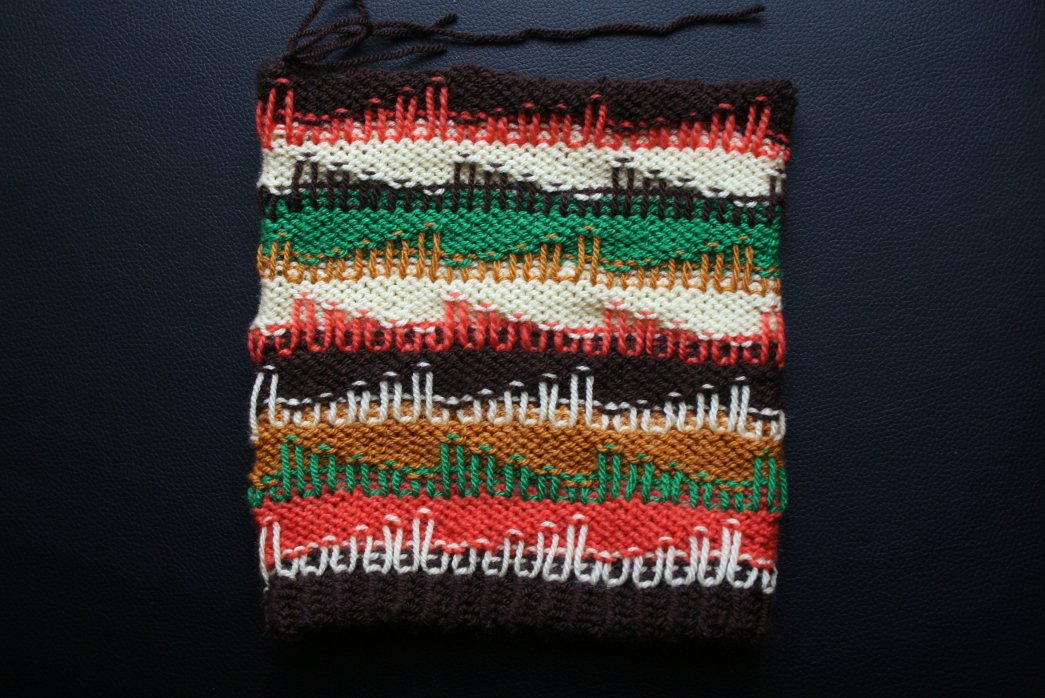
Nardole's Hat from The Eaters of Light
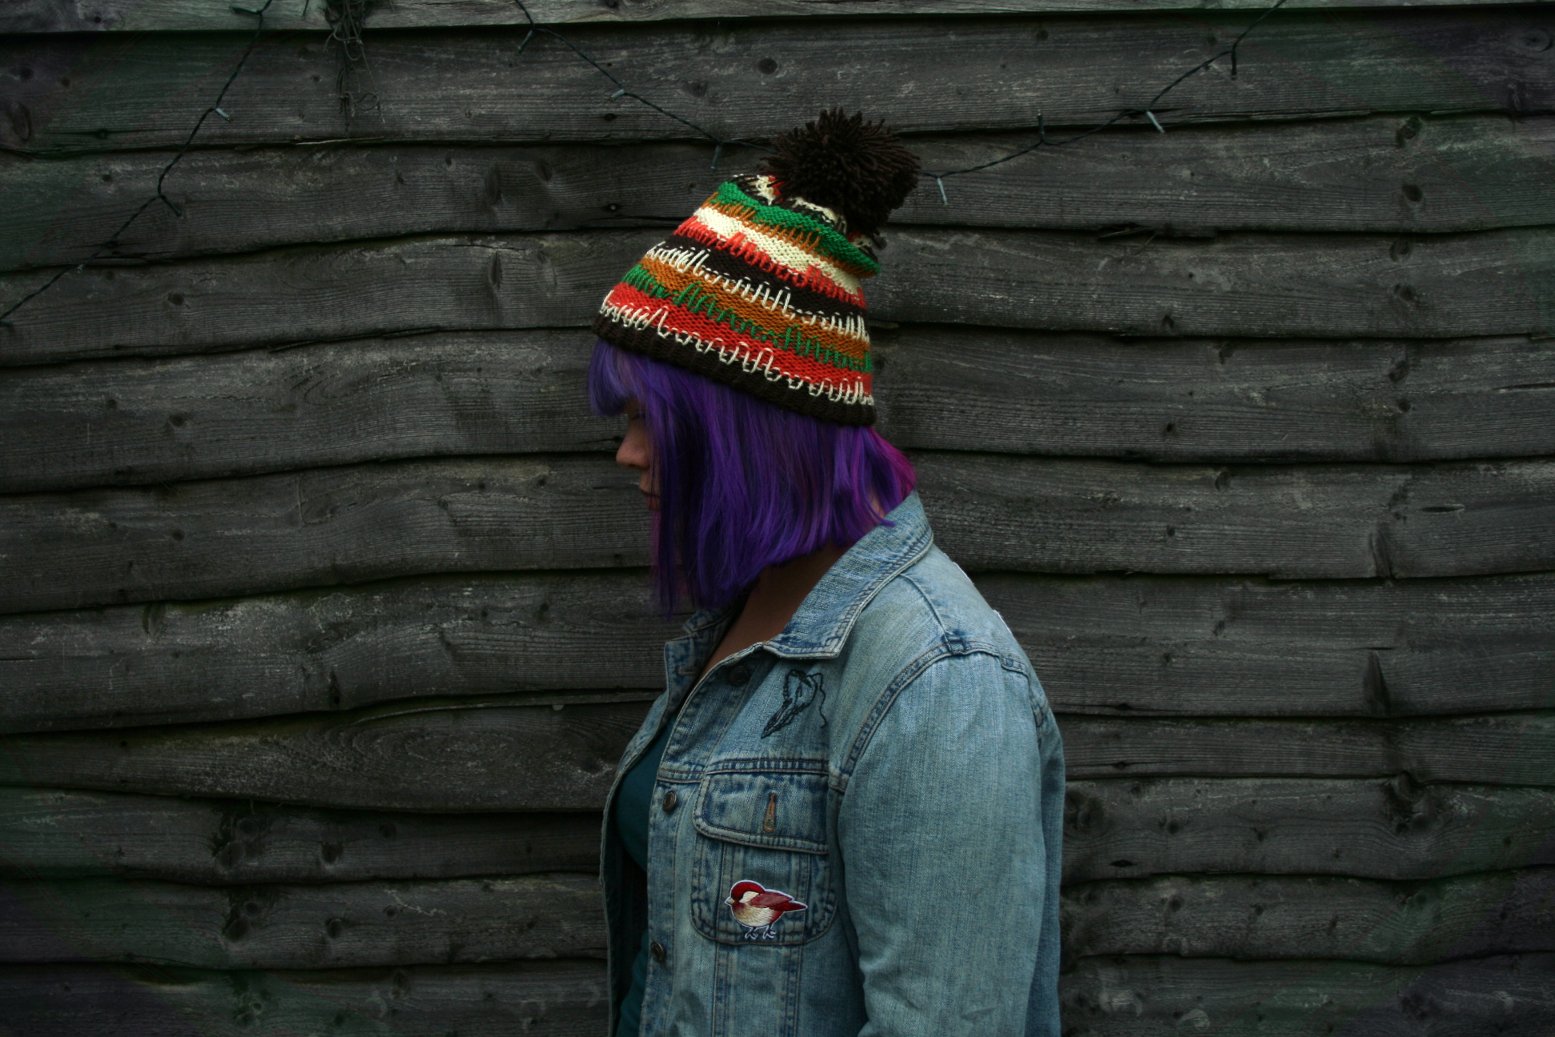
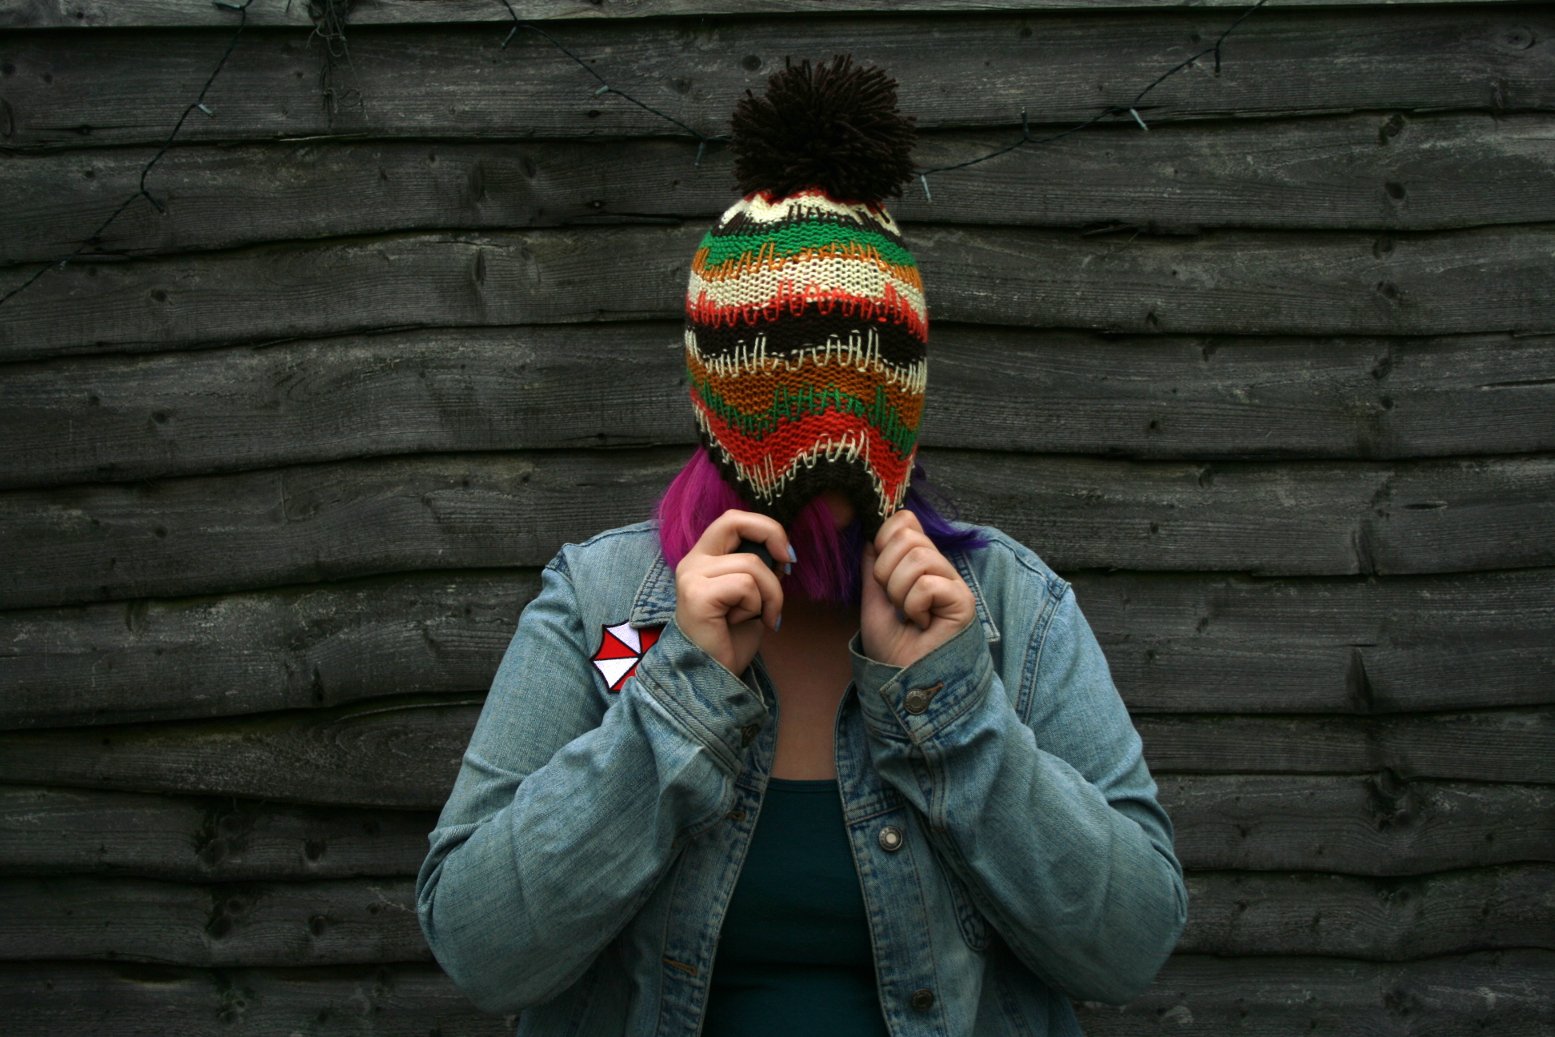
This is my version of the hat that Nardole wears in the Doctor Who episode The Eaters of Light. When this episode aired last week, I immediately knew that I needed to make his hat. It was fairly simple to make, and I'll share my process so that anyone who wants one can make one too.What you'll need:
US size 8 needles (5mm)
Double knit or worsted weight yarn
Special Stylecraft DK in Lemon Shade 1020
Special Stylecraft DK in Dark Brown Shade 1004
Special Stylecraft DK in Green 1116
Special Stylecraft DK in Camel 1420
Special Stylecraft DK in Spice 1711
Cast on 70 stitches in the round in dark brown (must be a multiple of 10)
Rows 1-13: k1, p1 all the way around
Row 14: fold the brim to the inside of the hat attach to previous row with k1, p1
From here on, the every row is purled. (The design is worked on top after completion)
1 row in lemon, 7 rows in spice,
1 row in green, 7 rows in camel,
1 row in lemon, 7 rows in dark brown,
1 row in spice, 7 rows in lemon,
1 row in camel, 7 rows in green,
1 row in dark brown, 7 rows in lemon,
1 row in spice, 7 rows in dark brown.
On the last row, pull a piece of yarn through all of the stitches. Do not gather it yet, it is easier to work in the design beforehand.
outside of nardole’s hat
inside of nardole's hat
The design on top is made by weaving pieces of yarn that are the same color as the single rows. They are woven around the knit stitch below this row and brought up to the stripe above at varying heights. This is difficult for me to explain, but I hope the pictures are good enough to understand what I mean. After making the design, tighten the yarn you previously pulled through the top row of stitches and secure. Make a large pom pom out of the dark brown yarn and attach it to the top.
If anyone does make this hat, be sure to let me know!
Since it's summer, I doubt I'll be wearing the hat any time soon. As soon as cold weather hits, though, I'll be wearing it all the time!

Raspberry Hood

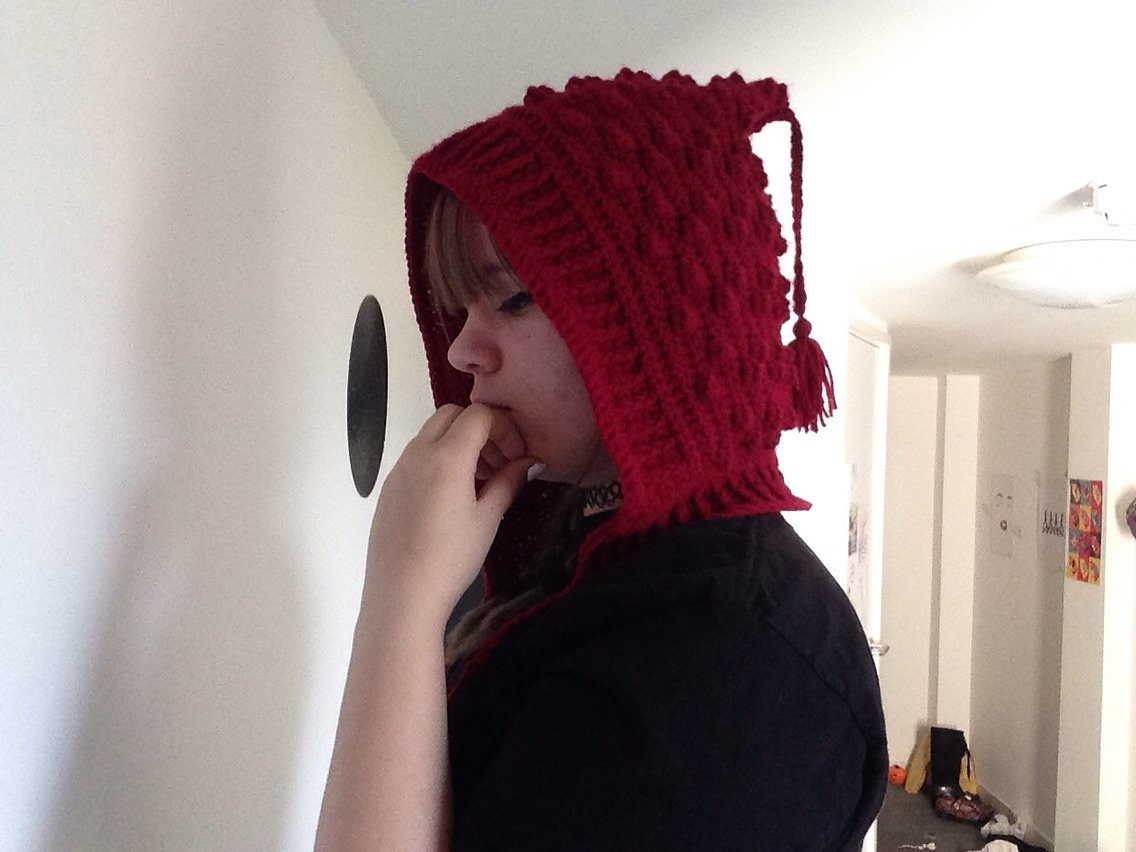 I made this hood using the Bobble Hood with Tassels pattern.
 It was easy and straightforward to make,but I did have a little trouble with the borders. I somehow messed up the back post single crochet so that it was on the wrong side of the piece, and had to match that when I made the second portion of the edging stitch.
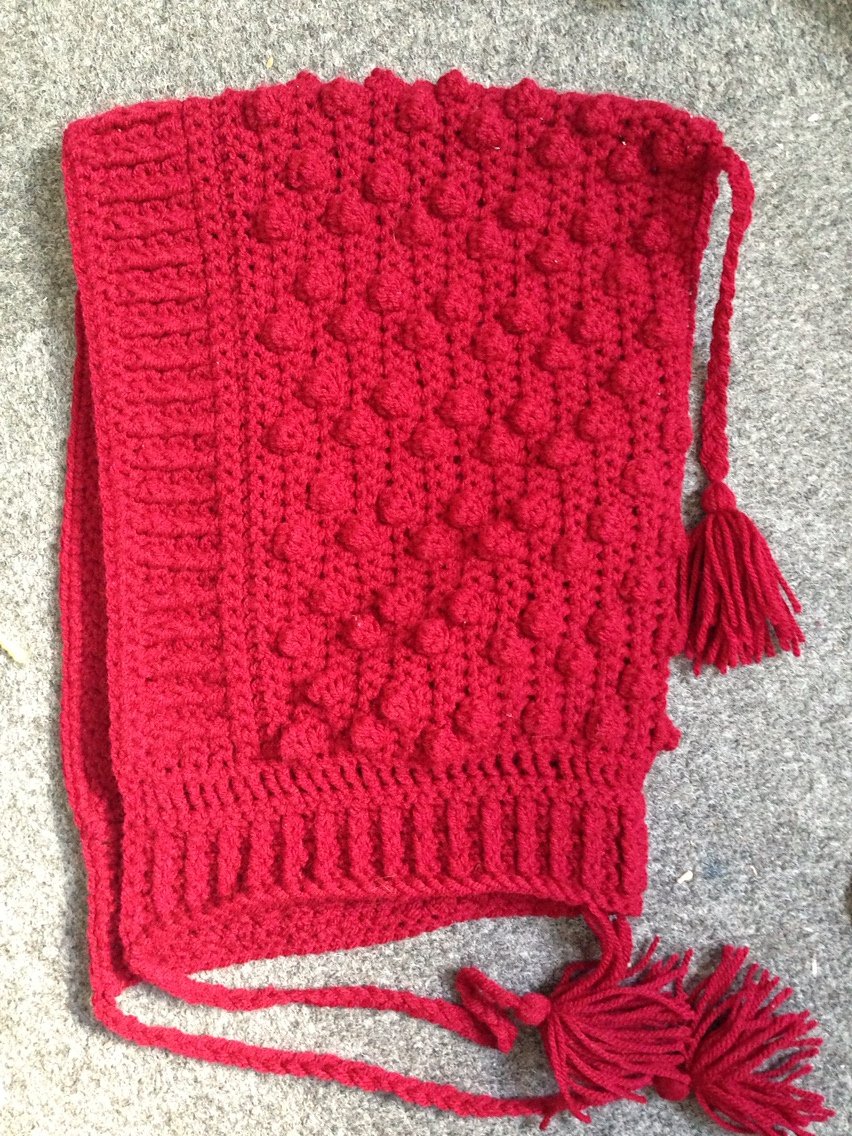 Looking back at the pattern, my hood appears to be a bit smaller than the original, and the bobbles are in slightly different places. I'm not entirely sure what I did to cause this.
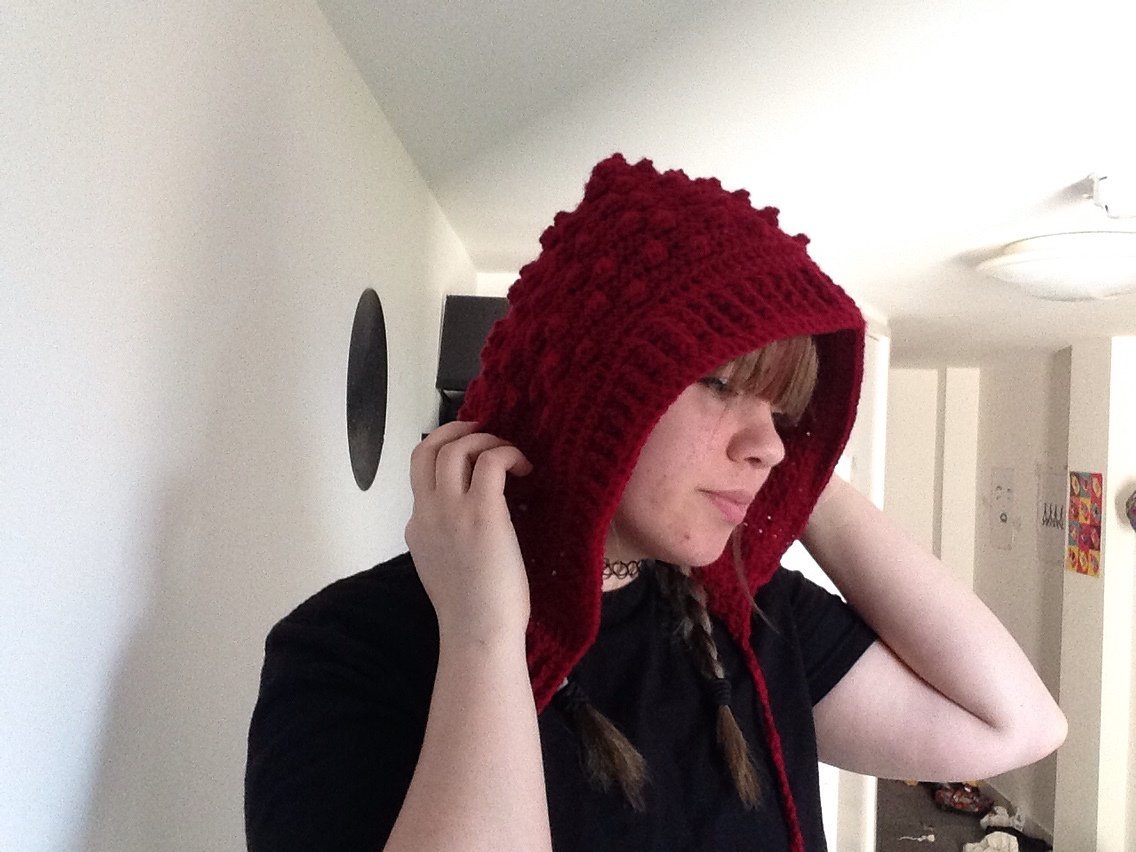 I am happy with the hood I ended up with, but I'm not sure it was the one that I was trying to make. I've received a lot of compliments on it, and might make another one. Next time I'll pay closer attention to the pattern to figure out what I did wrong.
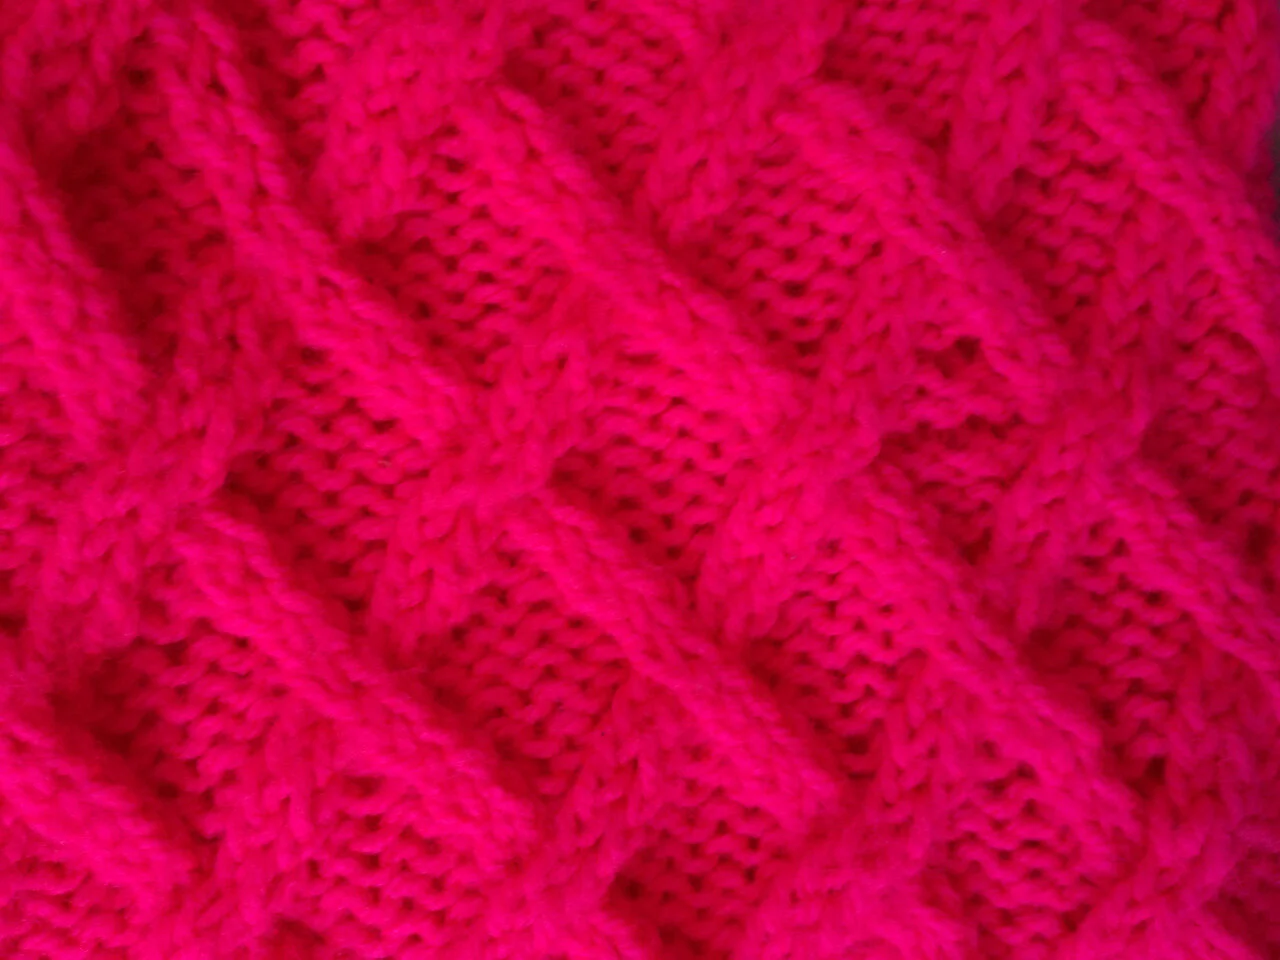
Pink Cable Knit
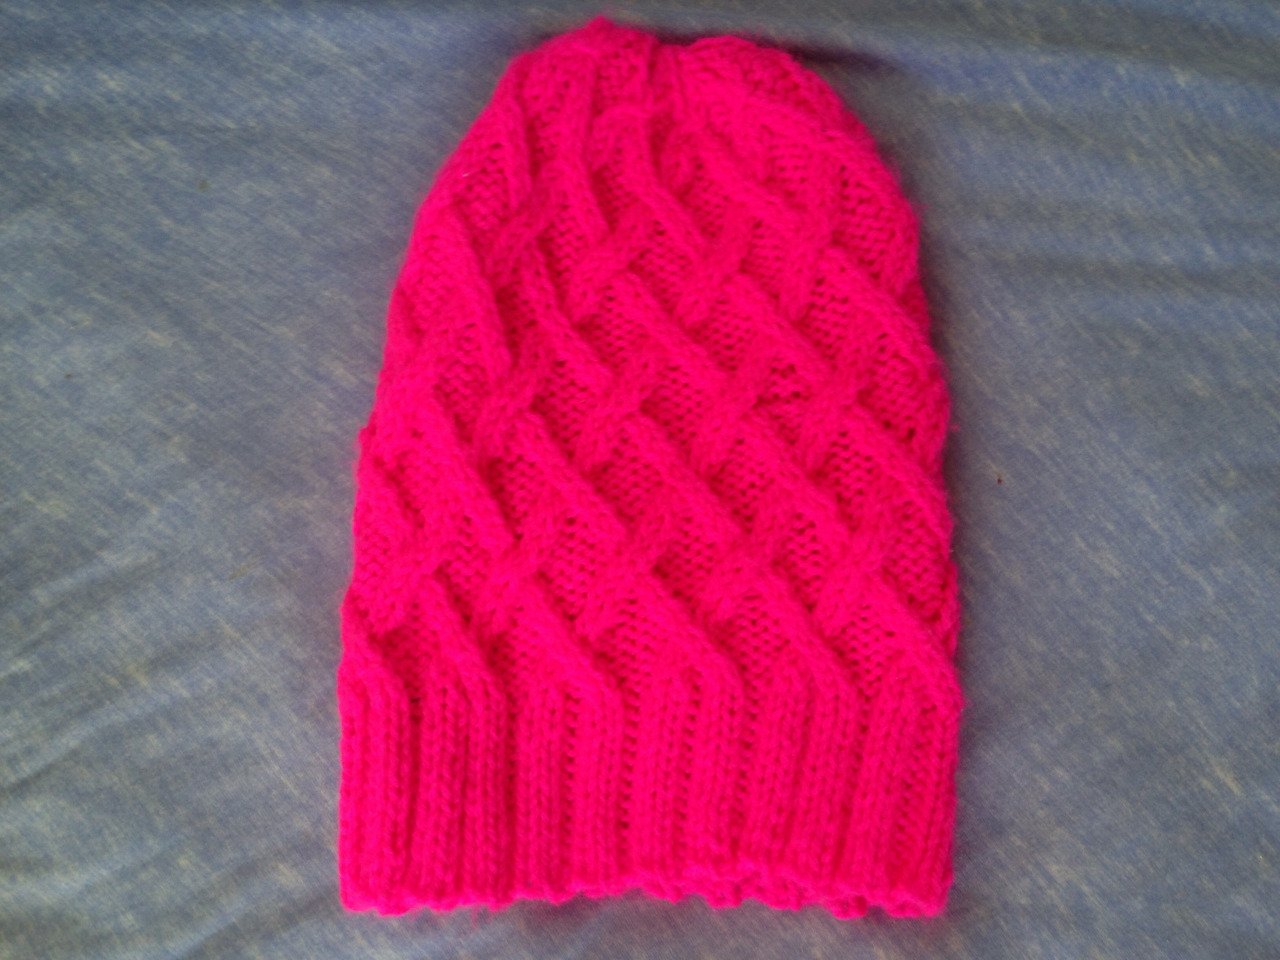 I made knit this hat from a pink yarn so bright it looks like it's glowing. It was super difficult to photograph and I apologize for the grainy photos. I made up the pattern as I went along, and although it isn't perfect, I can type up a version of the pattern if anyone wants to make this hat. Let me know if you're interested!Make sure to check out my facebook page if you haven't already!

All Grown Up Slouched Hat
 I made this hat using the All Grown Up Striped Slouched Hat pattern. The pattern calls for the hat to be made using an aran yarn, but I used a double knit (a double knit is thinner than an aran). In order to be able to make the hat to fit my head, I only needed to change the length off the hat. I used a 5.5 mm (I) crochet hook and made the small adult size. I crocheted about 6 more rows in the stripe pattern than the pattern asked for.
Devil or Angle?
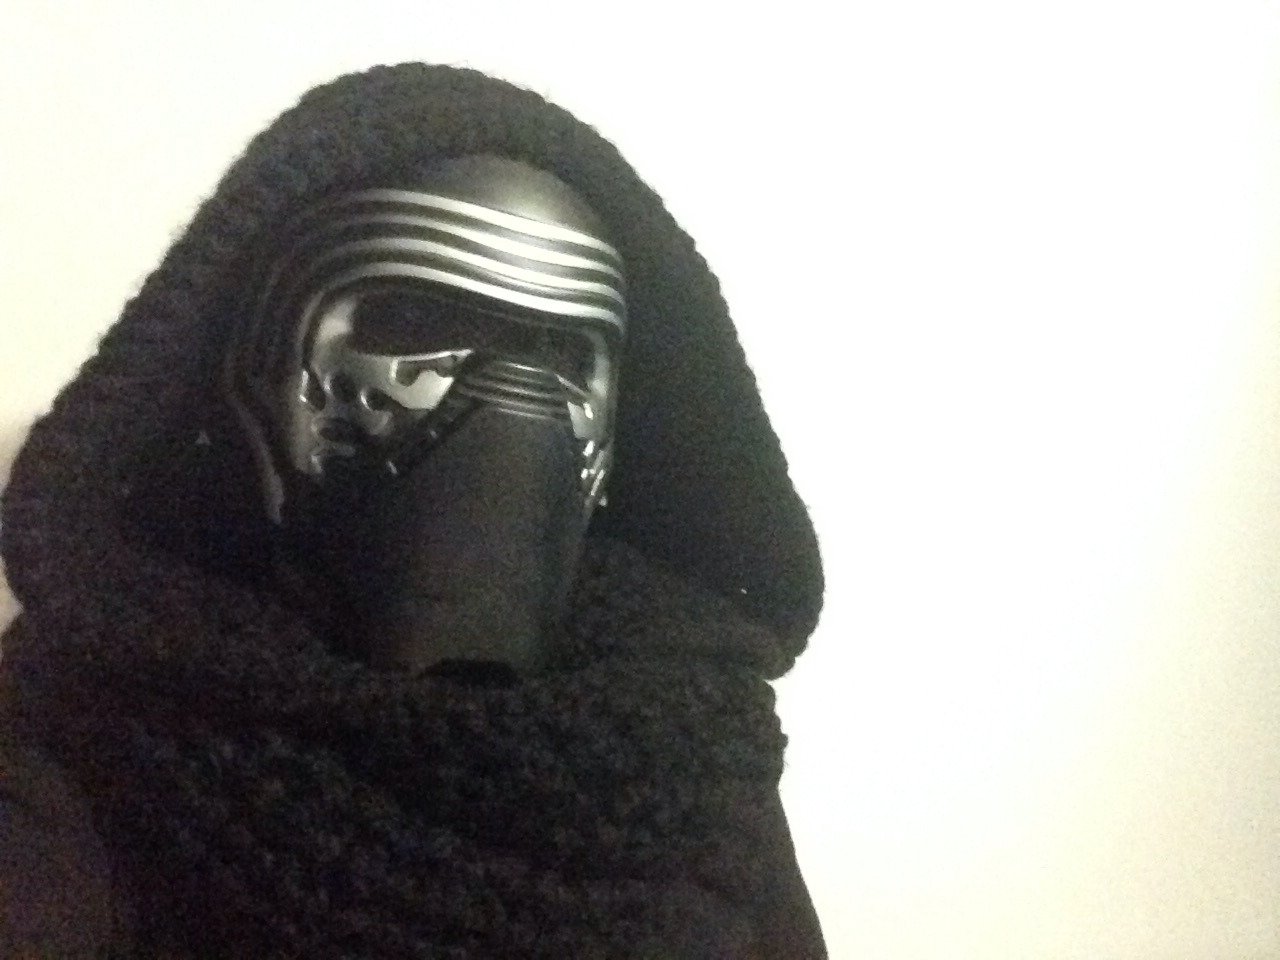 Why yes, that is a Kylo Ren mask! I made this combination hood and scarf using this scoodie pattern. From my calculations, I thought the scoodie would take about two balls of yarn to make, but it ended up taking six.
Hats for Trade
 I am very happy with the pom pom.
Hats!
 Yes! Another Star Wars hat! This one is BB-8, a character from Star Wars: The Force Awakens. I used a BB-8 Droid Hat Pattern, and modified the circles to be smaller, and looking at the robot in order to judge where to put them.
A New School Year
Sorry, it's been quite a while since I've last posted. Since then, I have moved to England and started my first year studying costume design and construction at a university level. I've been working very hard in class, and so kept forgetting to post. (oops!)During winter break, I went to Austria with my friend Ruth and stayed with her family. While in Austria, Ruth and I visited her photographer friend, Bildersanatorium, who was kind enough to take photographs of the many pieces I have made since September.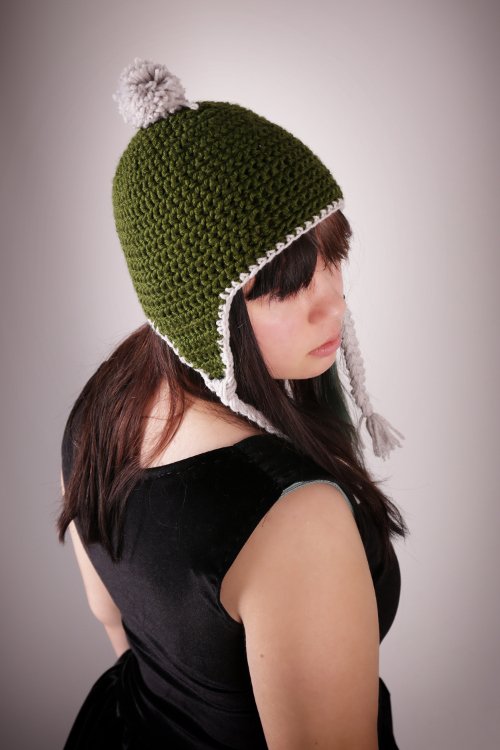 This hat was the second thing I made after moving to England. It's a very simple earflap hat made from double crochet and single crochet, with braided tassels and a pom-pom.
 This dress is made from a very nice stretch velvet I picked up from BSP Haberdashery. I felt it, and I just had to take it home with me. I made up the dress pattern as I went along, copying one of my tank tops for the bodice, and gathering two rectangles for the skirt. The dress is so simple that I was able to hand sew the entire dress in one night.
 This is my friend Ruth in cosplay as Mavis from Hotel Transylvania. She is modeling a knit hat and a crocheted scarf. The hat is a super simple pattern, I just altered knit and purl stitches until it reached the length I wanted, and then decreased. The scarf is made from the basic tunisian crochet stitch, which ended up making the fabric very thick and warm, but also caused a strange drape. I started making the scarf in red, but switched to black when I ran out of red.
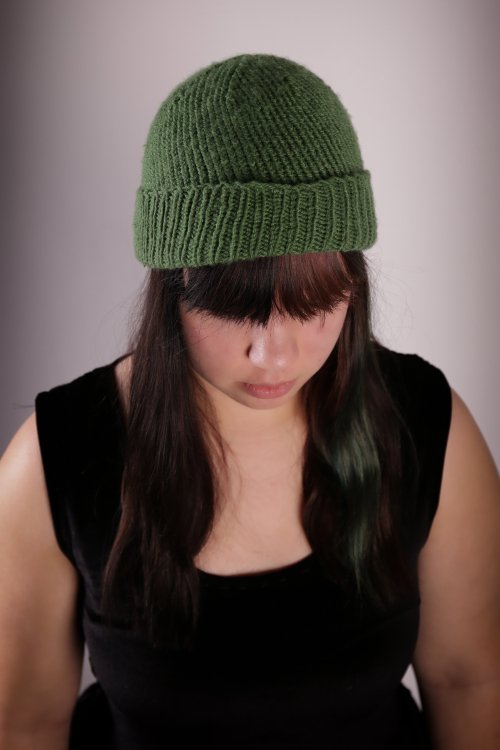
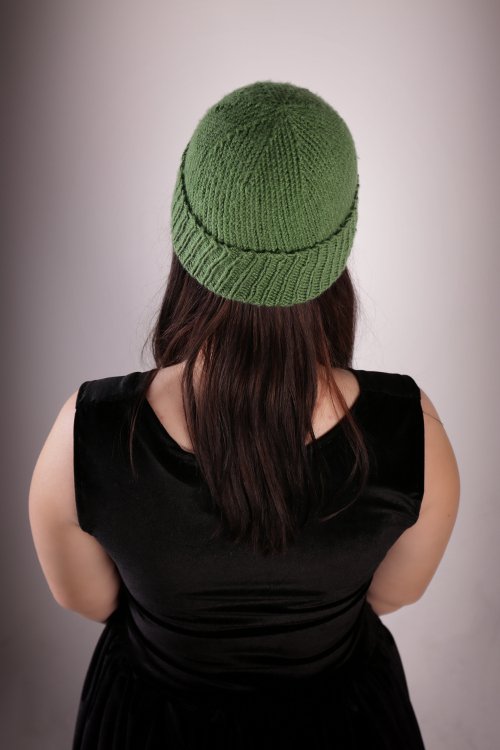 I made this hat for Ruth's dad for Christmas. It's a plain knit hat with a ribbed cuff.
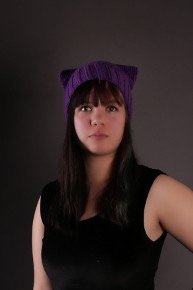
 This hat is made for Ruth's mom using the Kitkat Hat Pattern. The pattern was super easy to make, and I love the result!
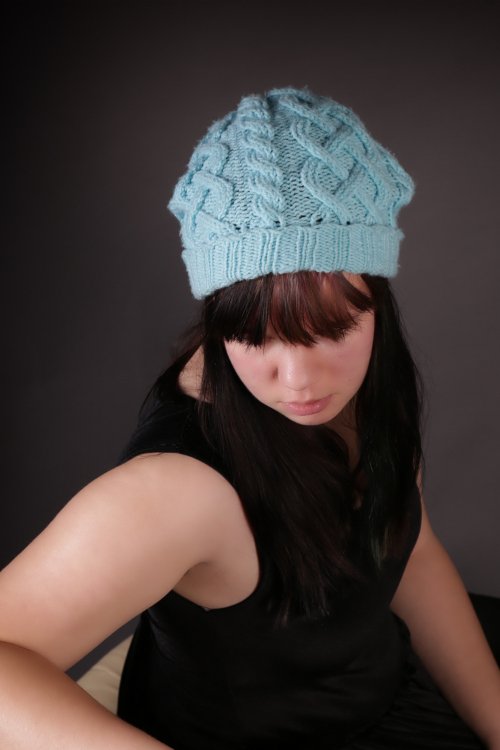
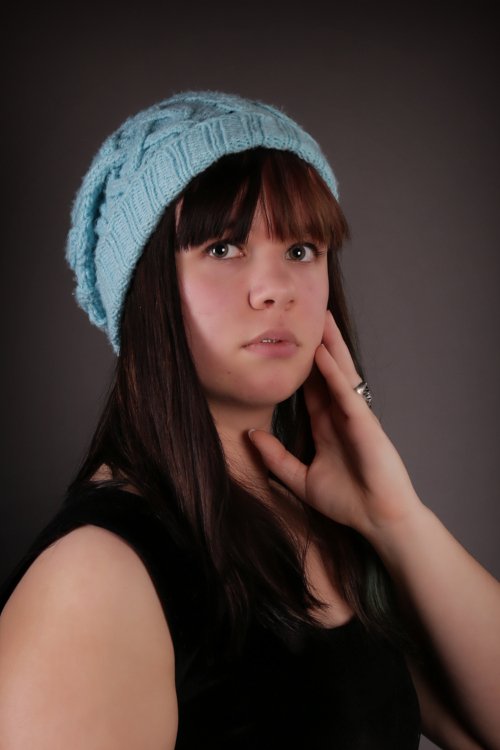 This is my favorite hat. It was my first time working with cables in a pattern and I love it so much! I used the Traveling Cable Hat Pattern and I found the instructions very easy to follow, although I did get confused while I was making the ribbing and messed up a bit. If you want to see in progress pictures of my hat, please click this link.
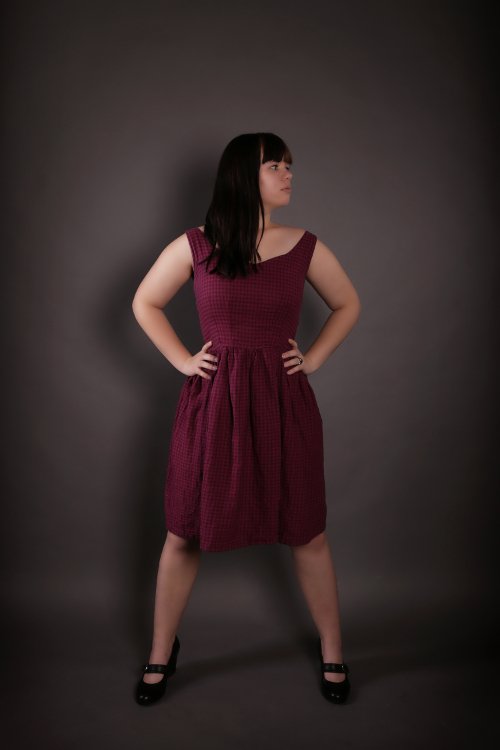
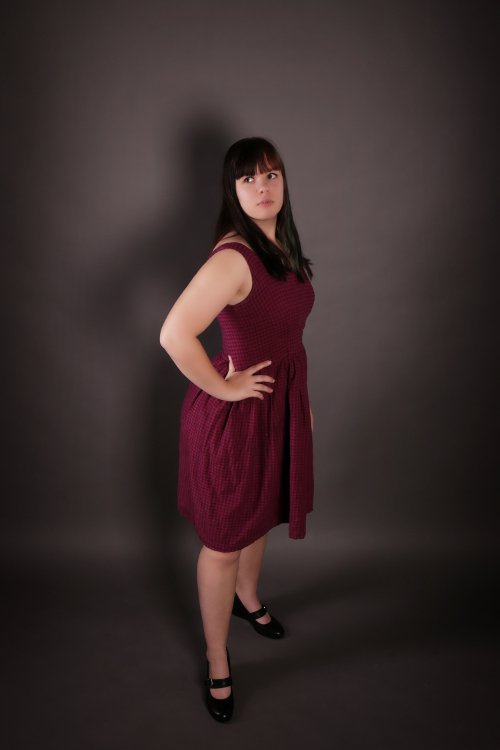 This dress is actually a project from spring of last year. It's made from the same pattern as the French Fry Dress out of a soft woven plaid fabric. I did not match the plaid because it is a very small print, and I lined the bodice with the same fabric used in the rest of the dress.I am planning on posting more often this year, and hopefully I'll stick to that promise!
Uchi-Con
 I shared a table with the Mangaka club from our school. They took up most of the table and sold buttons, prints, and commissions. I sold the hats that I had made over the past couple weeks, and I worked on crocheting more items while sitting behind the table.
 I completed a total of five hats before the convention, and then I completed another hat at the beginning of the convention, making for a total of six hats up for sale. All of the hats were patterns that I free-handed, meaning I didn't use a pattern and just made to fit my head. Three hats were pokéballs, one had cat ears, one had earflaps and bear ears, and the last one had a brim and a pom-pom at the top.
 Our table was pretty busy, and we often had big groups of people around our table. Many people stopped by to complement my work and to buy buttons.
 Overall, Uchi-Con was really fun and I loved seeing all of the cosplays and the work that the tables had on display. I would definitely suggest going next year!
Winter Gifts! (Part One)
 I made this hat out of a very nice wool blend yarn for my friend Georgia. I modified my "Spark" Slouchy Hat pattern by adding a band and stopping the dome of the hat early so that it would be a closer fit.I'm allergic to wool, but I did not have any difficulties working with the yarn, and the hat worked up fairly quickly. However, when I went to try the hat on, I discovered I was too allergic to wear it. Georgia had no problems with the yarn and was very excited to receive her gift.
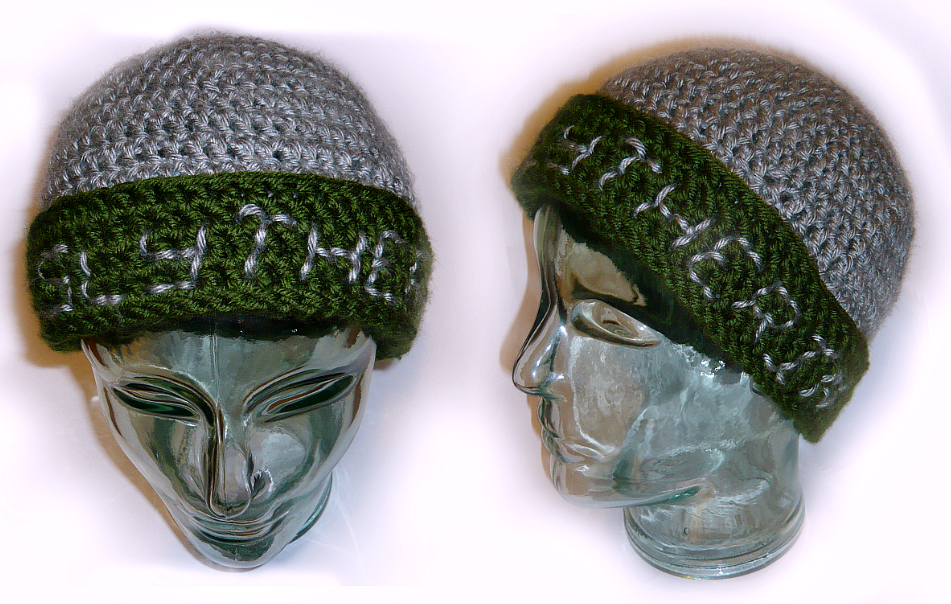 This hat I made for my friend Kate, who lives far enough away that I had to mail it to her. I originally wanted this hat to be an earflap hat, but I miscalculated how much grey yarn I had, and ran out very early on. I was able to fix the problem, and made a green brim for the hat instead of earflaps, adding the Hogwarts house name "Slytherin" to the brim in the remaining silver yarn.Over the next few days/weeks I will be uploading pictures of the remaining gifts I have given to my friends, as well as one I received. I will also be taking pictures of older garments that I may not have mentioned before, and posting those.
18" Doll's Earflap Hat


Stuffed Animal Top Hats!

"Spark" Slouchy Hat

 [gallery link="http%3A%2F%2Fwww.ravelry.com%2Fpatterns%2Flibrary%2Fspark-slouchy-hat"]
A slouchy hat made with three colors of yarn in double and treble crochet.